
This early war scenario has the French defending the Dunkirk perimeter against the Grossdeutschland regiment. It takes place on June 2, two days before the last troops have left the beach. The scenario was originally released as U21 in TURNING THE TIDE (ROAR G 17 to F 11); this version has several updates (ROAR G 1 to F 5). The reinforcing French tanks went from two to three; the reinforcements enter earlier, on turn four. The Germans lost a 9-1 and a LMG.

The French defend with nine 457 squads, a HMG, two MMG, two LMG, three leaders, four guns and some mines. Two of the guns are the famous French 75. One is the 25mm ATG. The last is a 105mm artillery piece. On turn four, the French receive reinforcements of two squads with a leader and LMG, as well as three R35 tanks.
The Germans attack with sixteen squads, half of them elite. There are five leaders (including a 9-2), two MMG, four LMG, two ATR and two Panzer 4D tanks. The Germans have eleven turns (!) to control at least seven multi-story buildings. They must fight through the hills of board three to reach the buildings of board one, although there is one victory building on board three.

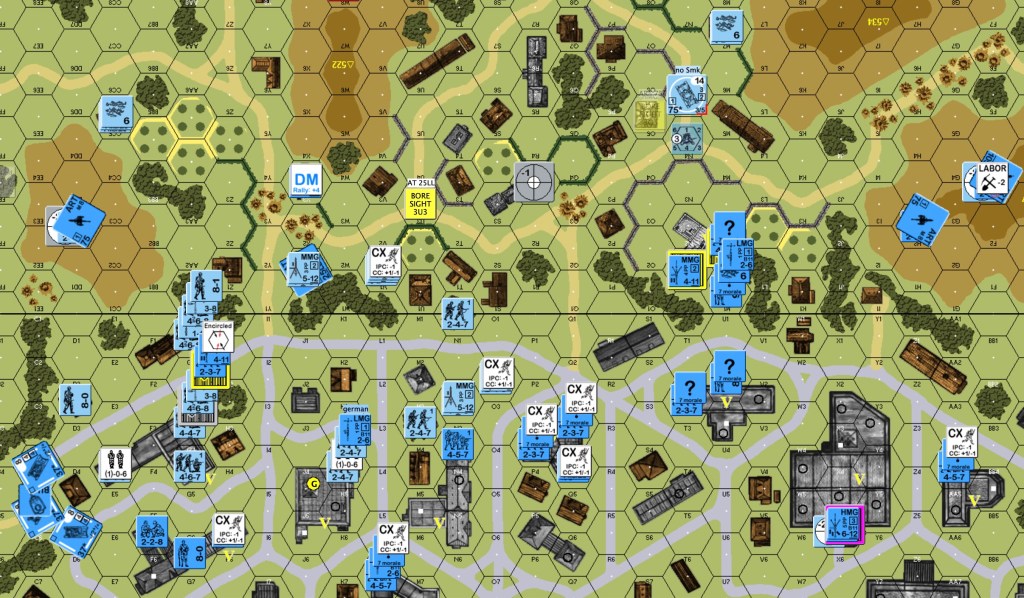
By SSR, there is a level three location in hex 1X5 and all grain hexes are orchard hexes. The French can set up on all of board one and slightly more than half of board three. I played the French side. The French have two important decisions. The first decision is regarding the guns: do they set up HIP in concealment terrain or do they set up HIP in hilltop open ground positions. My overall thinking was that I had to do damage to the Germans before they reached the stone buildings of board one. I felt that the three ART guns could dominate the German approaches by being on the hilltops of board three and thus slow them down and perhaps reduce their numbers. I put the AT gun in ground level woods near the intersection of two roads. The second decision is regarding the HMG and two MMG: put them up high or keep them at ground level for fire lanes. That decision was easy for me. When a SSR gives a level three location, I use it. I put the HMG with a half squad and a -1 leader up there. I decided the two MMG would be safer in level two stone locations than in forward ground level locations. One MMG in building 3N2 covers the center. The second MMG in building 1G3 covers the left flank. The mine factors have a slightly different set up limitation than the rest of the French OB. Since the German infantry are more important than the German tanks for taking buildings, I used all the mine factors for AP mines. The Germans have the entire west board edge to use for entry, so I defended almost edge to edge with the plan to move out of areas that weren’t threatened. Here is my setup.

If I had been playing the Germans, my basic plan would have been to pick the south west edge to enter, try to overwhelm the French defence in that area and then quickly get onto board one. I would have used a good number of half squads. The two Pz4 tanks are precious. The Germans need their smoke and can make use of the eight points of MG FP. It is difficult to use them well because they can be killed easily by three of the four guns.
The logs for this game are from 2022, so I will see what the German player did as I play back the logs to write this AAR.
German turn 1: My opponent played the first turn much the same as I would have. His approach was a little more spread out than half a board; it went as far north as 3K10. I had a small disappointment when a German squad walked through the bore site hex for a 75; the gun hit with a pivot, but the German easily passed the NMC. The Germans lost one HS KIA, had two broken squads and a HS pinned in a minefield, as well as another pin. Several leader-led stacks came on board late. The Germans broke one French squad that was in an open ground hill hex.
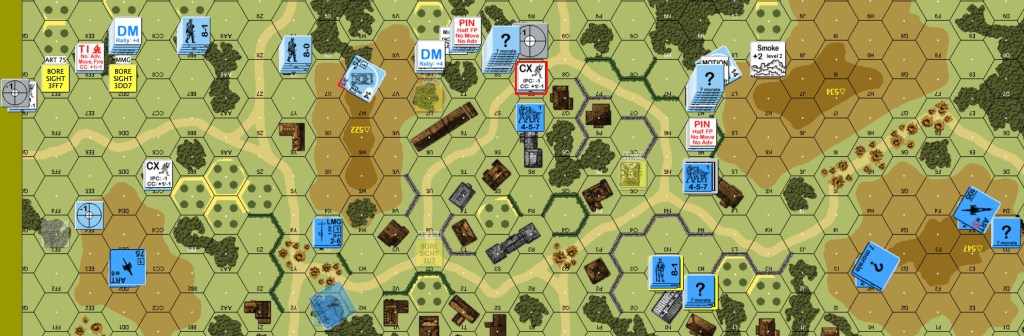
French turn 1: Their broken squad didn’t self rally. I deployed a squad in hex 1M2. One of the broken German squads rallies. A Pz4 had its CAFP in LOS of my left 75 ART gun. I pivoted the gun to fire, but missed. I intensive fired and hit to eliminate the Pz4. I put Opportunity Fire on three stacks that didn’t have great targets at the time. Two central front squads withdrew from the front. The deployed squad with leader moved left to fill the void left by the broken squad. The Germans took several DFF shots at the 75 ART gun on the left to no avail. They were luckier in the center; they broke the MMG squad and its 8-1 leader.

German turn 2: They bring back their remaining broken squad. Prep fire of 12+1 fails to hurt the left gun crew, but the MC triggers a sniper that hits the broken French MMG squad and leader. RS choses both units. The leader dies and the squad fails the NMC+1 to become a HS. In movement, a lot of units approached the left gun to within two hexes with a couple of pin results and one break. The middle German units moved forward varying amounts. The remaining Pz4 did armoured assault with a stack of infantry. The two French guns on the right fire at the units that approached building 3N2. I can’t remember why the 75 ART gun didn’t go after the stack or tank in 3M6. The left gun crew survived the AFPh.

French turn 2: Both sides failed to rally anyone. A French squad recovered the center MMG. The left gun, in what might be its last shots (Prep and IF) breaks only one squad of the many nearby Germans. The HMG inflicted two sets of PTC against the 3M5 stack; everyone passed all of them. The left MMG team broke the only German unit that was adjacent to the left gun crew. A squad helped the 105 ART gun crew push it into a better hex. The LMG team in 3X3 was pinned trying to withdraw; at least it was in a shellhole hex. A French squad had some good luck to dash from 3R3 to 3R1 successfully. German DF finally broke the gun crew on the French left. Surprisingly and quite irritatingly, a 6FP+3 shot breaks the center French MMG team.
German turn 3: The Germans rallied a squad. The French rallied one squad on their left. The Pz4 put out its last smoke to protect the central German moves from the French guns on the north side. During the German moves, a squad is CR’d, another squad is eliminated, in a building no less, by the 105 gun. German advancing fire breaks the LMG team in the shellholes. A French HS on the left voluntarily breaks to avoid CC with a German squad.

French turn 3: Neither side was able to rally anyone. The Germans recover the French 75 ART gun on the left. The French HMG, without the leader (who needs to move for rallies) rolled snakes against the 3M5 German stack, but the result is only one pinned squad. Of course, without the leader, the fire cowered and no rate. The rest of the units either skulked or moved back, except for the two leaders that moved forward to reach broken units. The 105 ART gun, with a squad helping, tried unsuccessfully to move south. The Germans fired the 75 ART gun at the 105 ART gun and missed. The broken LMG team surrendered; the German HS with the captured gun prevented the French squad from routing away. I moved my 8-0 leader towards it for no reason after all.
German turn 4: The Germans rallied two HS. The clever German player tried to use the captured French gun to put smoke on the 105 ART gun. He didn’t break the gun, but the smoke round missed. The German units that moved in the south had no problems surviving the DFF of the French. The center Germans fared less well, in particular the 3N5 stack. The leader was wounded trying to retreat for rally. The two squads broke trying move forward. The Pz4 moved to a position to fire at the HMG and out of LOS of the French guns. A couple of German HS in the center are almost behind the French MLR. The French lost another HS as a prisoner. A German HS in the center claimed the first of the seven buildings required.
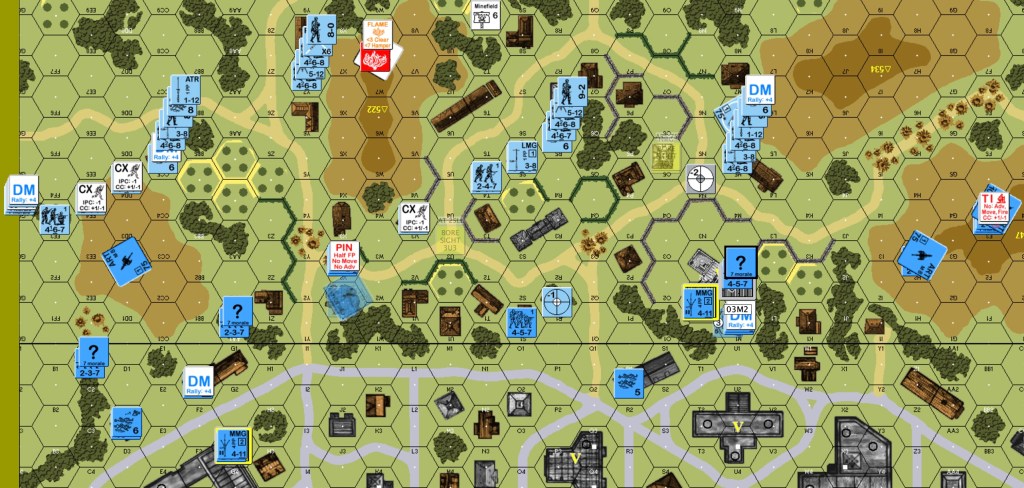
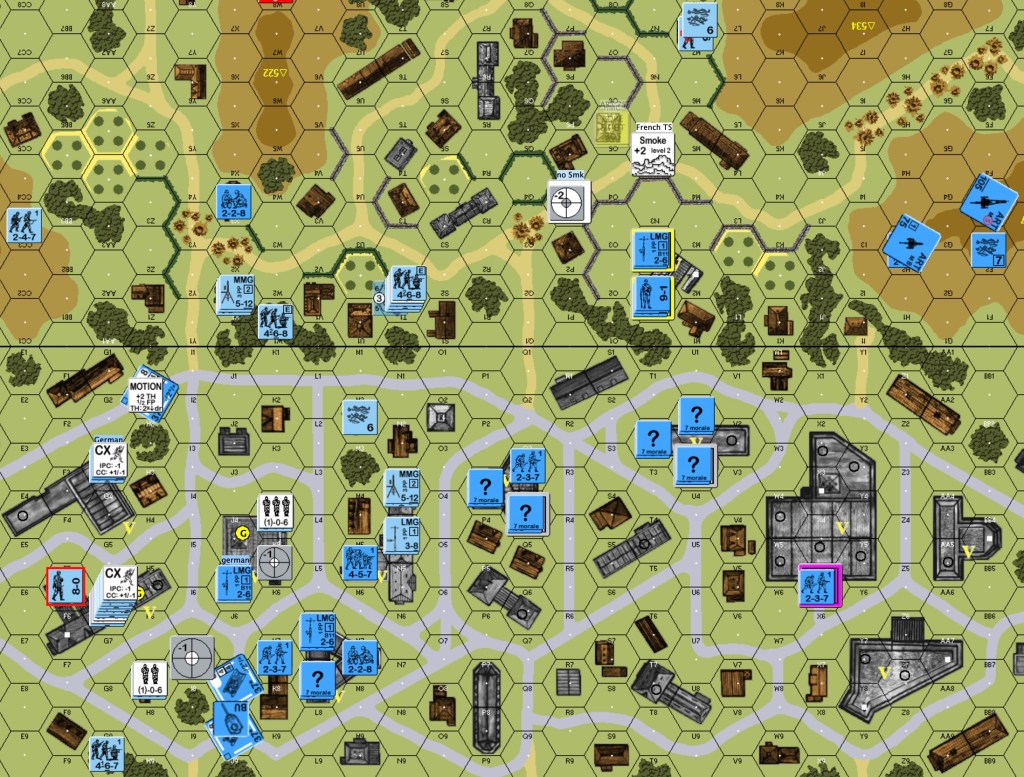
French turn 4: My reinforcements are coming! I received three radioless tanks, two squads and a 7-0 leader. A HS rallied with snakes and generated an 8-0 leader that I really needed. The German 9-2 leader rallied up two DM broken elite squads. Fortunately for me they didn’t have great LOS. The 105 gun fired at the captured 75 gun for no effect. The French 75 could see only a HS, which it fired at and missed. The HMG also had no effect. On the French left, one of my squads tried to retreat through open ground. German DFF rolled a KIA. The 1G3 building was a problem for the MMG team because the stairwell hex is exposed to German fire. The French tanks just barely reached a position in the south to be able to fire at Germans that approach the buildings.

German turn 5: The Germans had only two HS needing to rally; both failed. The French failed to rally the 3M1 LMG team that needed an eight DR. The Pz4 fired at the HMG position and missed. A 12FP+2 shot didn’t affect the 1G3 MMG team. Two German squads successfully dashed into the 1G3 building. One of them was in the stairwell hex, so it forced encirclement on the MMG team above. To add insult, a German HS with prisoner moved in front of and adjacent to a French tank to reach the 1G3 building. The tank intensive fired and hit them, but both passed the NMC. French DFF is overall ineffective. The 25LL AT gun came out of hiding to fire AP at the moving 9-2 stack in the open. The gun hit the target but rolled high on the effect. If I had taken the IFP 1 down 2 shot, I would have inflicted an 1MC on the stack. Grrr. The AT gun crew broke to advancing fire.
French turn 5: The French LMG team in building 3M1 finally rallied. The Germans rallied a rear HS that had been broken for a long time. The French 75 put smoke in front of the Pz4. The 105 and HMG fired without effect. The French infantry moved to consolidate or skulk. I’m surprised to see that I moved the 9-1 and LMG team to level two of building 3M2 instead of back towards other victory buildings on board one. I am curious how that turns out. In 1G3 the MMG team retreated away from the stairwell and adjacent German unit, but still broke to other German fire. The tank platoon split into two, with two tanks moving to the next defensive line. The captured French 75 hit the the 105 crew and broke the crew.

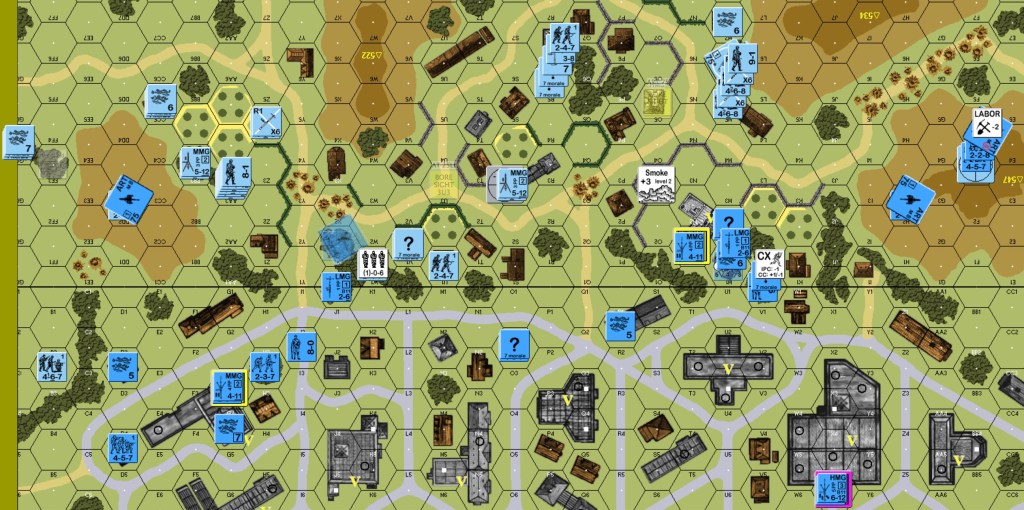
German turn 6: The Germans rallied a HS and made it elite by HOB. The French rallied the broken crew behind enemy lines. The captured French 75 missed its shot and should have been malfunctioned, but we seemed to have not noticed. The Germans mopped up building 1G3. A broken HS surrendered, giving the Germans their second victory building. The Germans also took building 1F6, that the French had abandoned. They pushed the captured AT gun to where it could fire at French tanks. The solitary French tank pinned a German stack trying to cross the road on which the tank is parked. The 3M2 French infantry kept the Germans away from the center of board one. The Pz4 moved in bypass of several obstacles as it hides from the French 75. The Germans sent troops into building 1M5; half of them broke to the defending squad. The advance phase saw more Germans enter that building.

French turn 6: Neither side was able to rally anything. French prep fire was used to put DM back on two units. The rest of the French infantry hid from the Germans. The solitary French tank passed its TC to move down the road to overrun the stack that was pinned there last turn. The captured AT gun fired at the tank and missed. The captured French 75 fired at the tank and missed. A German ATR fired point blank, hit, but did not kill the tank. A squad passed its PAATC to do street fighting, but also did not kill the tank. The overrun was a 6 down one attack. I rolled a 1MC result. Both the German leader and squad passed their MC and triggered a small sniper that went to a hex with the German 9-2 leader, but missed the leader. The platoon of French tanks moved to protect the French held buildings 1L6 and 1M5. German defensive final fire was ineffective.

German turn 7: The Germans failed to rally anyone. Same thing for the French, who also eliminated their HMG on its repair attempt. The Germans X’d out the captured French 75 by rolling high. German prep fire was disappointing for them; four shots all had no effect. The Pz4 moved to a HD position threatening building 3M2. The French 75 still nailed it, on an IF shot no less. German infantry gathered in building 1F6. That French crew behind enemy lines started to attract the attention of several German units; that crew could conceivably take back victory buildings.
French turn 7: The two broken German HS failed to rally. Same for the broken 105 crew. The French 75 put smoke on a forward German MMG team. The tank platoon shot at nearby targets; the only effect was a broken CMG. The French crew behind enemy lines died while moving to another position. Some French units skulked out of sight. Some went upstairs to hopefully be harder to chase out of the building. A few units from the French north moved towards the Germans. Advancing fire from building 3M2 eliminated one of the broken German HS.

German turn 8: The 9-2 finally rallied its broken HS. The 105 crew didn’t rally again. German prep fire was 50/50. The 9-2 stack made an ineffective shot, but the 1G6 stack broke a well positioned French LMG team in 1L6. Two units tried to move by the tank platoon, giving open ground shots. One made it (to 1J10), one did not. A German squad tried a dash in sight of the solitary French tank. The tank rolled snakes with its CMG to eliminate the squad; nice. The German MMG team moved out of the smoke and survived a feeble shot from the adjacent French squad. The recently rallied HS moved one hex and then broke to DFF. The Germans advanced the MMG team back into the smoke to my surprise.

French turn 8: The 105 crew finally rallies. A German HS twelves out. No prep fire. Most moves are to skulk, although that is not possible near the 1J10 German squad. A crew went into the building nearest to the German squad. The tank platoon adjusted its position to hurt that squad. The solitary tank failed its TC to move alone. A concealed HS moved moved forward to building 1S1 to help the tank cover some open ground that the 9-2 stack would need to cross.

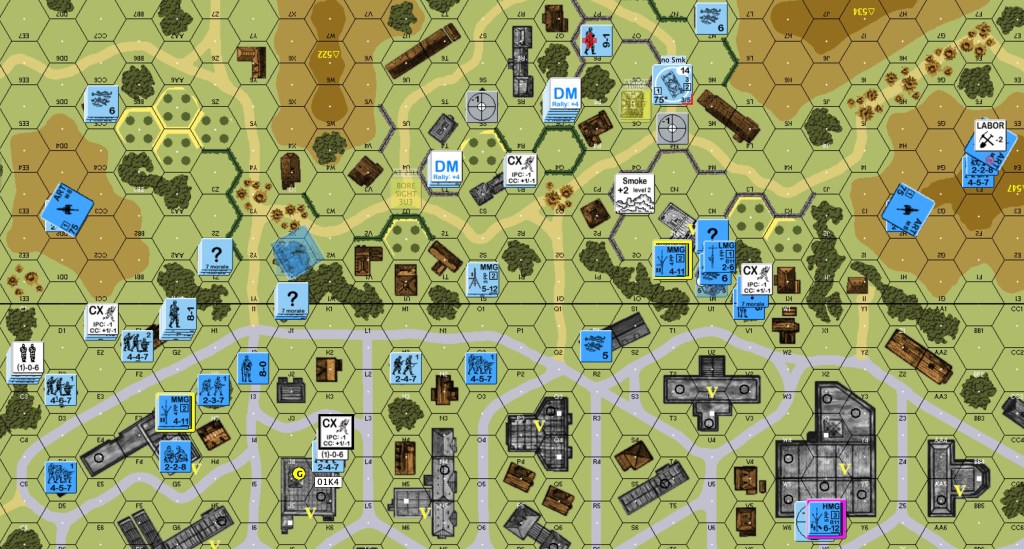
German turn 9: The Germans rallied two HS. The French failed to rally the 1L7 squad. The 9-2 stack inflicted a 3MC on the MMG team in 3M2. The French 9-1 pinned and the squad ELR’d and was casualty reduced. A HS with a prisoner dashed in front of the 1J8 tank. Despite having acquisition and Case L -1, the tank caused only a 1MC which the prisoner failed but the HS passed. Two other DFF shots failed to stop the HS from reaching its destination. The French squad in building 1M5 attracted several German units. The Germans were able to move quite a few units with impunity. Only prisoners and the wounded 9-1 died. The 1J8 tank broke its MA firing on a leader-squad stack moving in the open. During the rout phase, the French 9-1 self broke to rout with the HS. I think that was the wrong thing to do. It perhaps should have stayed put and manned the MMG until the other squad in the building could get there. In building 1L6, a French HS voluntarily broke to avoid a 3-2 CC; it routed to Level two. The leader and broken squad in that building got out. The French squad in 1M5 stayed put for CC, but I am a little surprised at that; the Germans had enough adjacent troops for a 2-1 CC. That 2-1 CC was painful for me because the Germans rolled a three and I rolled snake eyes. The generated leader didn’t change the fact that the French squad was eliminated. It eliminated a HS in return.

French turn 9: Neither side rallied any units. The French 75 had only one target: a leader with a broken HS. It fired, hit and DM’d the HS. Most French infantry skulked. The crew in building 1M9 was broken trying to fall back away from the Germans. The solitary tank failed its TC again. The tank platoon repositioned to cover the 1O3-O6 road. The Germans have four victory buildings. The French defensive line looks thin.
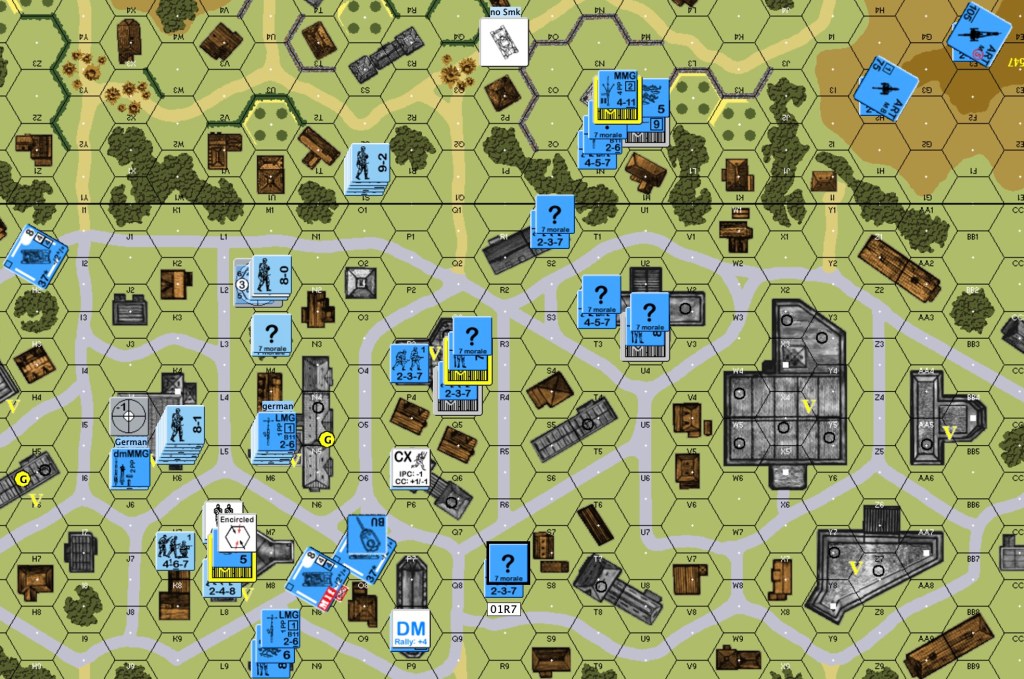
German turn 10: The only broken German HS failed to rally. The French 9-1 rallied and then brought back a green HS. The French 8-0 rallied up a green LMG squad in 1M9. The Germans mopped up building 1L5 to give them their fifth victory building. A German HS died while trying to cross the 1O3-O6 road. An 8-0 leader broke trying to do the same. A German squad died while moving in open ground near a tank that got lucky with its MA. An 8-1 leader tried to lead two squads across the 1O3-O6 road. The lucky tank intensive fired its MA, hit and then rolled snake eyes on the effect. Although it was a K/2 result, the German player decided to concede. Just for the heck of it, I played out the K/2 result while writing this AAR. The leader died to the K. One squad rolled HOB and became fanatic. The other squad pinned. The LLMC caused the fanatic squad to break.

Despite not knowing the K/2 result, I agreed with the German player that it would be very difficult to seize two more victory buildings from where the troops currently were. I enjoyed the game. It had a lot of tense moments.
Discover more from Low Ammo
Subscribe to get the latest posts sent to your email.

Well done keeping the French parameter intact!! Looks like a real tight game.
LikeLiked by 1 person
Nice production values Michael, really well done! Thank you for this.
LikeLiked by 1 person
Excellent AAR it really captured the intensity of the scenario!
LikeLiked by 1 person