
This scenario drew me in because of the rarely seen match-up of Polish armour and Russian armour. Then they went and made it more intriguing by using Polish armour made in France. As well, the Poles are attacking a Russian held village, not the typical situation one would expect to see in a Polish-Russian battle in 1939.
There is a Russian garrison of seven squads, a MMG and a 37mm ATG. They have fourteen “?”, which they need because the Polish attacker sets up on board. Where are the tanks, you ask? They enter the game on turn three with additional infantry, from the east edge, which is into the flank of the Polish attack. There are six Russian tanks, evenly split between two types: BT-5 M34 and BT-2A (all using BFP counters).
The Poles attack with thirteen squads, two MMG, an ATR and six AFV, also evenly split between two types: H39 and R35.
The AFV match-up is interesting; the Polish AFV have better armour (6/4 vs 2/1) while the Russian AFV have better guns (45L TK 10, 37L TK 9 vs 37* TK 7). Both sides are using platoon movement. The Polish AFV have one man turrets. The Russian AFV have restricted slow traverse turrets. The Russian AT gun is also 37L.
I had the Russian defenders. The battle takes place on two BFP half-boards that have a couple of out-of-the-ordinary terrain features for ASL: sparse orchards (always out of season) and mixed-material buildings which are stone on the ground level and wood on the upper level. The Polish need to take three buildings that are marked on the map with a yellow “V”.
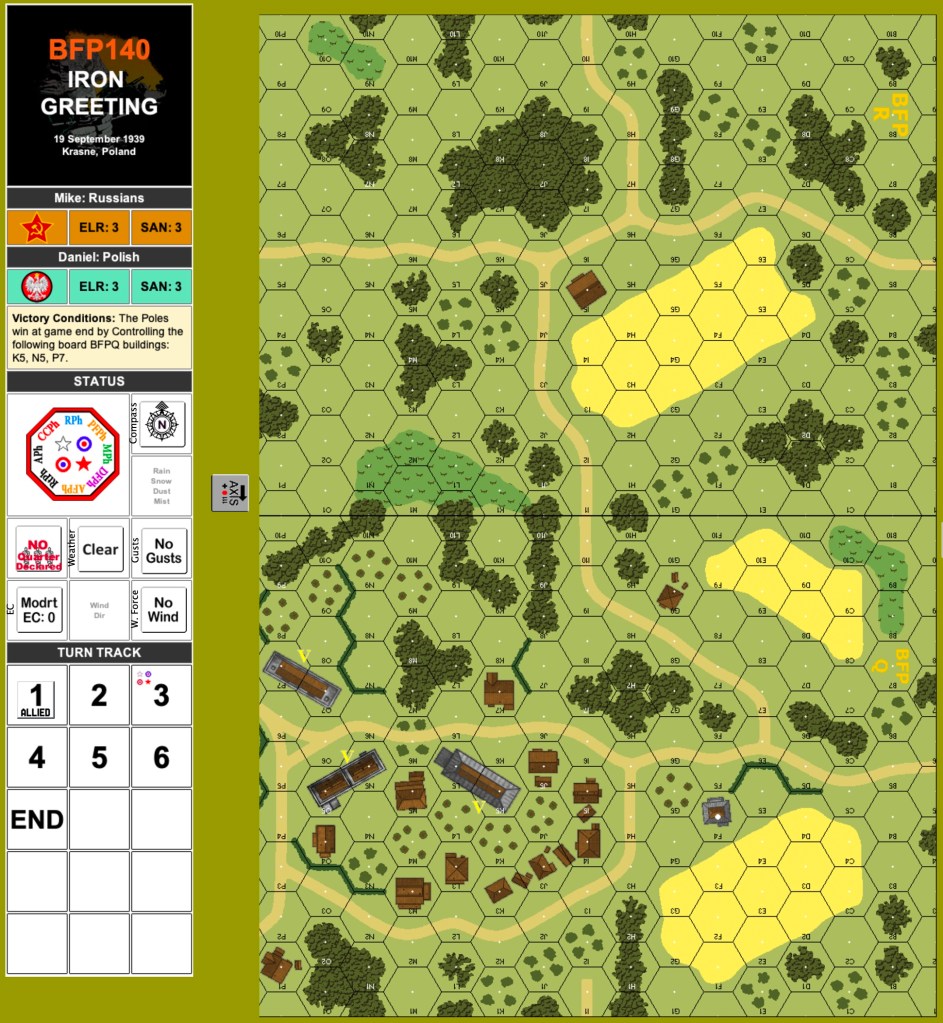
I decided that the most forward victory building on the left would be the first to go. I also decided that the AT gun would be better used against the Polish infantry than the Polish tanks in this scenario, especially since this is the BFP edition that has canister ammunition. I positioned it to be able to fire at that building that I planned to give up. To avoid VBM freeze, some of the Russian defenders are stationed in level one locations. Below is an image of the Russian setup.

The Polish attack focussed mostly on the victory buildings, with a small flanking force. The Poles eliminated two dummy stacks and the Russians eliminated one half squad.

In Russian one, some of the rear Russians prep fired to no effect. As the front squads withdrew, one was casualty reduced and the resulting HS later broke. The Russian sniper broke a squad in a stack having three squads and a leader. Since the stack had no targets, my opponent did the rarely seen activity of a sniper check! The Russian sniper was reduced to two. The dummy in the O7 building could not leave, of course. The Russian MMG broke.
The second Polish turn saw the H39 platoon move behind the Russian positions. The Russian AT gun held fire because even a side shot a close range could result in a TK of 11 versus an AF of 6. I still thought it would be more valuable against the infantry. The R35 platoon moved towards the two rear victory buildings and used VBM to lock the fire of one squad, but the squad put out some residual before that happened. The Poles took the O7 building, of course. A Polish squad attempted to flank the defence in the east; it was broken, ELR’d and casualty reduced. In DF, the Russian AT gun started shooting at the Poles in the O7 building. Things started well although there was no canister available; a miss with rate followed by a rate hit that broke a squad. The following shot, however, broke the gun. Polish advancing fire broke and ELR’d a squad in the east. A Polish HS went for CC against a pinned Russian squad; that ended in melee.
The Russians were lucky in the Rally phase, repairing both the MMG and the AT gun. The Russians in the west prep fired to no effect. The squads in the middle skulked behind the victory building. Although I wanted to reinforce the melee, I didn’t want to risk the required PAATC to do it, so two Russian squads advanced into one victory building hex. The CC went in favour of the Polish; the HS eliminated a squad.
Polish turn three had some effective prep, breaking the two eastern squads and pinning the MMG team. Lack of defenders in the east allowed the Poles move into the eastern buildings. The H39 platoon moved to interdict the Russian reinforcements’ shortest route to the battle. The R35 platoon moved to restrict Russian routing from the victory building. The AT gun reduced one Polish squad to a broken HS. A Russian squad in the south died for FTR. Two in the victory building routed upstairs to prolong their agony. A Polish HS eliminated a Russian 7-0 in CC and generated a Polish 7-0.
The Russian received reinforcements on their turn three: six AFV, four squads, a LMG and a leader entering from the east edge. The AFV all have 22 MP. I did not charge directly into the line of H39 tanks. All AFV came in CE, either to try for infantry smoke or to use road movement rate. I entered one platoon just north of the middle board seam. The other platoon came in on the north road. An infantry platoon with the leader entered between the two platoons. One squad came in along the south edge.
During prep fire, the AT gun eliminated a Polish squad in the west P7 victory building; the MMG team broke the leader in that building as well. As the first platoon was moving in, the Polish ATR scored a CH on one of the AFV to destroy it. This platoon moved to freeze the middle Polish squad. The infantry platoon and leader stack was able to move its full eight hexes without receiving fire. The second AFV platoon moved towards the west P7 victory building to complicate the rallying of Polish units there. That platoon took some bounding fire shots and broke one MA. The rout phase caused the elimination of 2.5 Russian squads on the east K5 victory building and invoked NQ. The Polish brokies in the west P7 victory building could only rout upstairs.

Polish turn 4 saw their tanks move to protect the K5 victory building and help attack the N5 victory building. The infantry also regrouped to defend K5 and attack N5. The broken Polish in the P7 victory building were further whittled down to only a broken leader.
During Russian four, the center platoon moved to freeze the Polish MMG stack in the middle, surviving shots from the Polish tanks and the MMG to do so. A BT-5 in the west broke off from the platoon to freeze the north Polish squad, which allowed the Russian reinforcing infantry to move closer to the action. One Polish tank took an MG shot at a leader and squad stack to force a TC, which they passed. The BT-5 platoon moved from the west to challenge the Polish R35 tanks near the N5 victory building. Lots of Polish tanks took shots at them with the result of a shocked BT-5. One H39 broke its MA. In the AFPh, the tank that was locking the center Polish MMG stack fired at them and broke the stack, except for the leader. Luckily, the leader and two broken squads were able to rout back to the K5 victory building.

Polish turn five rally phase was disappointing for them twice: non of the broken units rallied and the shocked Russian tank recovered. During the prep fire, an R35 immobilized the just unshocked BT-5; the crew bailed. A H39 destroyed the BT-7 that had broken the center MMG stack. Another R35 passed its TC to move independently; it moved to freeze the Russian MMG team in the N5 victory building. Before the freezing, I fired the MMG and squad at the adjacent AFV to leave eight residual in the hex. A Polish leader and squad approached the N5 victory building; as it went around the eight residual, a Russian squad in level one of the N5 building fired at it and broke the leader. The Polish squad did a late double time to get into a building adjacent to the N5 building. A Polish leader with two squads was able to assault move adjacent to N5. Advancing fire only pinned the AT gun crew. The CX Polish squad advanced into the N5 building for CC in hex O5; the Russians eliminated it at no cost. Two Polish squads and a leader advanced unopposed into N5.
Russian turn five saw a good Polish rally phase. They rallied the broken leader in the P7 victory building and two squads in the K5 victory building. They also repaired the MA of a H39. In prep fire, the Russian AT gun pivoted to fire at the AFV that was locking its fire. On its second shot, it destroyed the H39, but unfortunately set it ablaze. The BT-5 crew that had left its tank assault moved into the adjacent P7 victory building, surviving some defensive fire directed at it. In the N5 building, the level one Russian squad skulked back and the MMG team skulked up. A BT-5 moved into a woods hex to lock the fire of a HS. It passed the bog check, but an R35 immobilized it and the crew abandoned (so still mission accomplished!). This left only two motion H39 tanks to fire at the reinforcing Russian infantry as they moved towards the P7 building. Both H39 missed their shots. At this point, the Polish conceded.
I enjoyed this scenario. I would play it again to try the Polish side.

Discover more from Low Ammo
Subscribe to get the latest posts sent to your email.

Looks like a scenario to out in the future!
LikeLike
Another great writeup! This reminds me I gotta play AFVs more aggressively.
LikeLiked by 1 person