
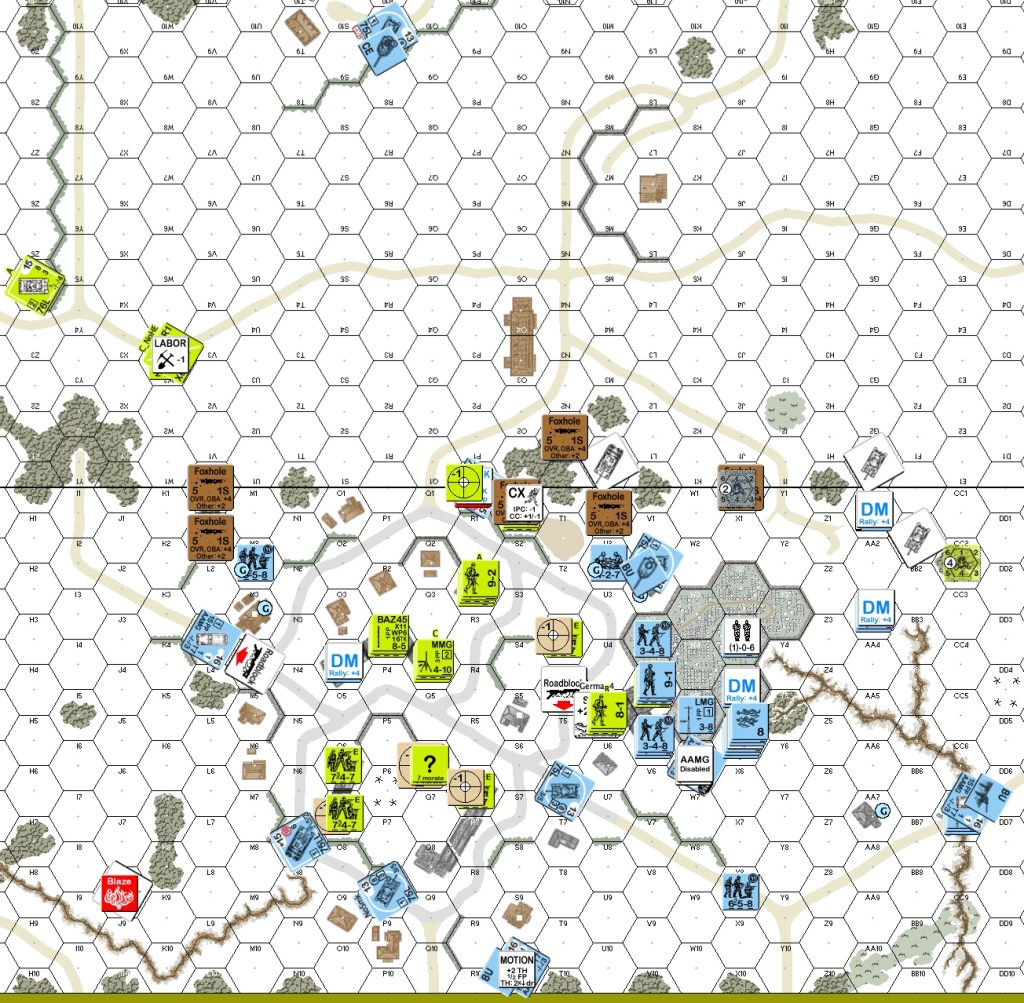
An updated version of this scenario came with the last edition of Yanks. Journal 13 has a discussion that states the differences, but I will skip that. I will discuss only this updated version. Rex Martin designed a scenario pitting a formidable German force against paratroopers of the 81st airborne supported by anti-tank guns and tank destroyers. The scenario takes place a little more than two weeks after the start of the Battle Of The Bulge, coincidentally on my birthday (day only, not year!!). The German force is trying one more time to reach Bastogne, although the scenario is located at Longchamps, Belgium.

The German force has SS infantry, 16 squads worth, with good leadership and a reasonable number of MMG and LMG. Their big punch is supplied by three Panther tanks and six Panzer IV model H tanks. The American defends with 14 squads, decent leadership, 1 HMG and 3 MMG. Their AT assets are numerous: 2 M10 tank destroyers, 3 57mm AT guns and 3 BAZ45. There are also two light mortars.
The Panthers are king of the battlefield, as long as they can keep their front armour of T14/H18 towards all threats. The M10 TD has a 76L gun having a penetration of 17 or 22 with APCR. The M1 AT gun is 57L; it has a penetration of 15 or 17 with APDS. The Panzer IV tanks are vulnerable (T6/H8), of course, as are the four halftracks in the German OB.
I had the German attackers. Their mission is to take 22 buildings on board 12 and have three mobile tanks at game end. I wanted to have a schwerpunkt against one point in the American defence, rather than a broad front attack. It seemed to be a bad idea to attack up the centre. I chose to attack from the German left. I was trying to have the infantry approach near and through the graveyard with some armour support, while other armour went around the graveyard to approach the town farther to the rear.
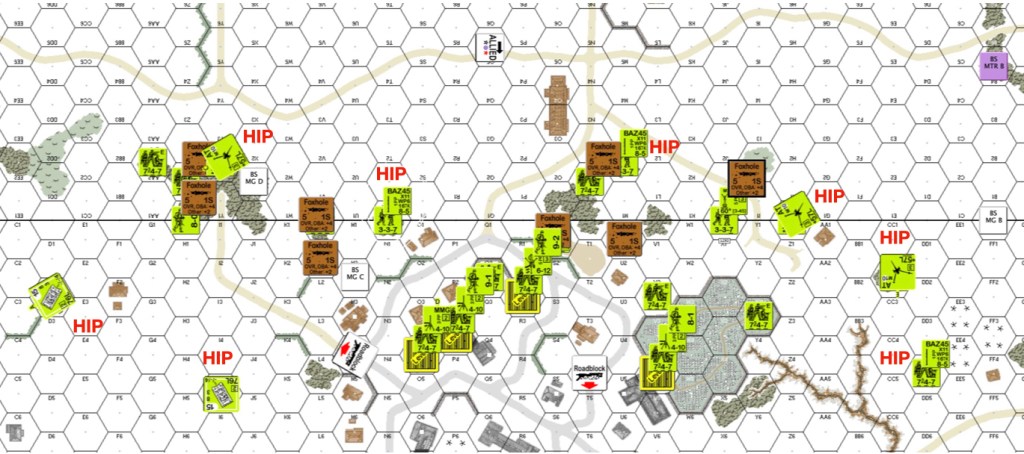
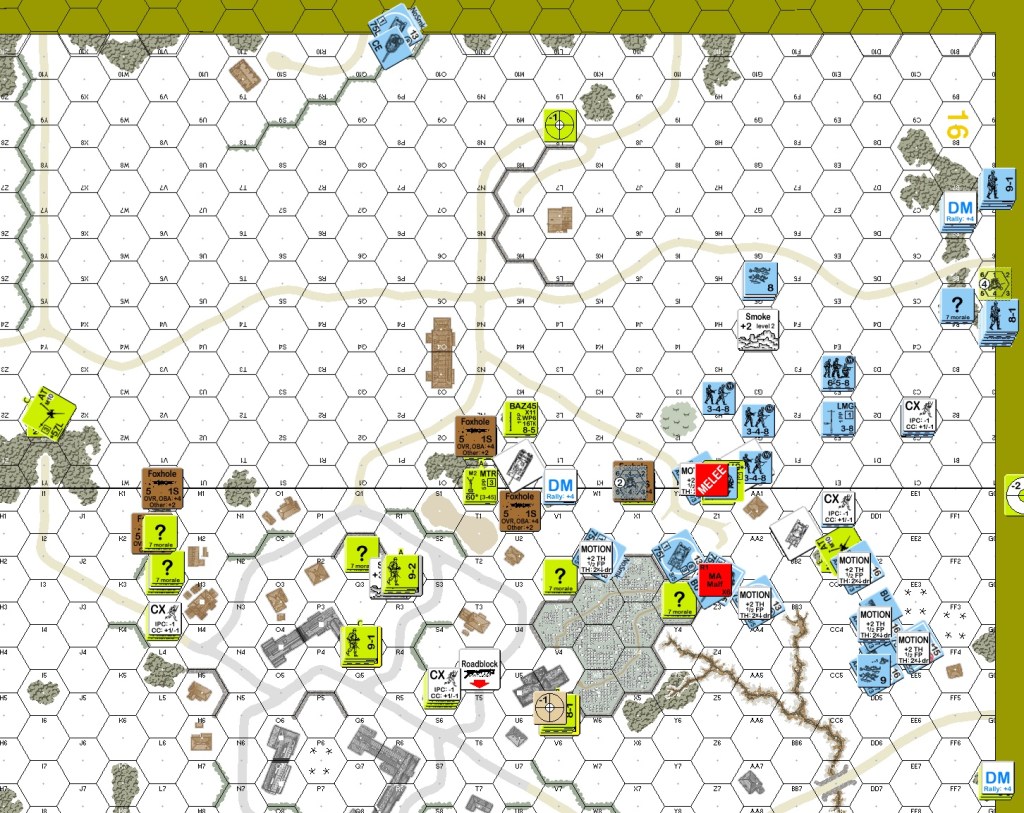
I chose to do a lot of armoured assault. I positioned the halftracks to come along the board edge, but they would follow infantry that would check the woods for the enemy, since the Americans could set up on all of board 16. The American OB included two HIP TD, three HIP AT guns and two HIP squad equivalents. I designated two Pz4 tanks to go a short distance in the middle, so they could later provide smoke on the level two American positions. One of them attracted the attention of an AT gun in the west. The gun missed and the tank was able to duck out of sight. The other Pz4 tanks used their smoke dischargers to help protect anyone behind them. The halftracks all came in BU. The woods that I needed to clear were free of the enemy. The only American defensive fire during the German movement was the HMG from level two, directed by the 9-2. In the AFPh, one Panther breaks its MA.

During American turn one, the Americans repaired the HMG. One of their light mortars had some fun shooting at my troops in the woods. The HMG also fired at the troops in the woods at two down one, breaking concealed stack of a 9-2 with two squads. Between the mortar and the HMG and all the MC they triggered, both snipers broke a couple of units on both sides. The infantry that didn’t fire shifted east toward the German attack. The AT in the west pivoted to fire east through a small opening in the obstacles. With a couple of acquisitions on the HMG team, they advanced down to level one.
In German two, a Pz4 smoked the HMG position with its last smoke round. The Panthers moved first. One of them found a HIP BAZ by getting shot in the rear and destroyed; the crew survived. I kicked myself for not sending the Panther with the broken MA. An AT gun came on board to destroy an adjacent Pz4; again a crew survived. A second Pz4 finds a second AG gun and is eliminated; again I get a crew. Two empty halftracks move to tie up each of the AT guns. The infantry moves taking some casualties from the multiple American MMG this time. A loaded halftrack followed a southerly path that a Panther took into an orchard area. Unfortunately, it finds a HIP squad with a bazooka by moving into its hex. The bazooka misses, but the squad fire breaks the passenger of the halftrack. The return fire of the halftrack breaks the bazooka squad. In the APh, the tank crews moved in for CC with the gun crews that destroyed their tanks. The Americans won one CC, but the other remained in melee.
American turn two prep fire broke or dm’d a few units. Surprisingly, the AT gun with a halftrack in bypass wasn’t able to destroy it. Infantry continued to shift toward the Germans. An M10 came on board and moved to cover the center of board 16. Someone (missing part of log) shot into the AT gun melee; the German crew died and the American crew broke. German fire also broke the forward bazooka team.
In German three, most broken Germans rallied, most importantly, the broken passenger in the forward halftrack. In prep, two Pz4 fired smoke at level two positions. Unfortunately, we missed that one of the Pz4 no longer had smoke. During movement, a Pz4 got a luck bounding fire MG kill on the mortar crew. It continued towards town and accidentally exposed itself to a low-odds shot from the M10. Fortunately, the M10 missed and the Pz4 continued forward. Two tanks and two loaded halftracks moved into the rear of the town. Infantry moved closer to the graveyard and tried to take care of the American gun crews. I still had a few stragglers in the northwest woods that needed to catch up. One American crew became prisoner during rout; a broken paratrooper squad in the north was eliminated for FtR. During CC, an SS squad eliminated the other American gun crew in the middle of my advance.

In American three, there was some ineffectual prep fire from smoked MG teams. The last AT gun crew in the west started pushing their gun east. The second HIP M10 appeared and moved to engage the German halftracks in the rear of the town. It came into LOS of one loaded halftrack and then stopped. The halftrack failed the motion attempt, failed the smoke attempt so fired at the M10 with six FP. They stunned the M10! Several American infantry units, some concealed, were successful in occupying the buildings nearest the German halftracks in the rear of the town.
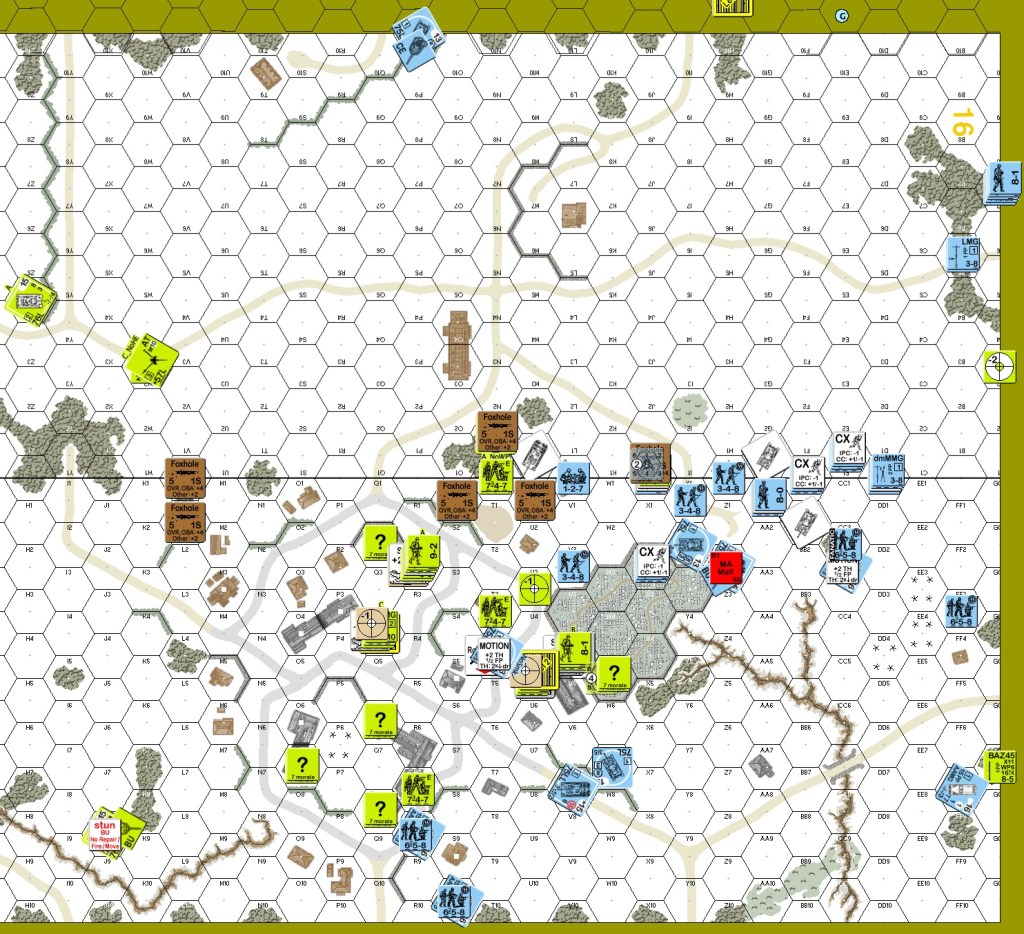
In German four, a Pz4 smoked a MG team again in building U5. The center Pz4 at the start line took some long range ineffective shots because if it moved it stood a good chance of dying. The two loaded halftracks went behind the Americans and unloaded in bypass. The nearby Panther tank moved up to the formerly stunned, and still BU, M10. It failed its motion attempt and the Panther eliminated it. Some infantry reached the graveyard. The stragglers from the northeast woods made good distance towards the action. In the graveyard, I sent two squads and a leader against an encircled paratrooper squad that refused to break. The American squad eliminated the leader and one squad.

The Americans did a little prep fire and also moved towards some of the German incursions. During defensive fire, I fired into the graveyard melee since the German squad had a morale of 8 and the American squad had a morale of 7. Of course, the German squad broke and the American did not. The broken SS squad now has a morale of 9. I fired again into the melee. This time, the American squad broke and the SS squad rolled a twelve to die. Crazy. I probably should have given up at that point, taking that course of events as a sign that my ideas just weren’t working in this playing. At least the American squad was eliminated later for FtR.
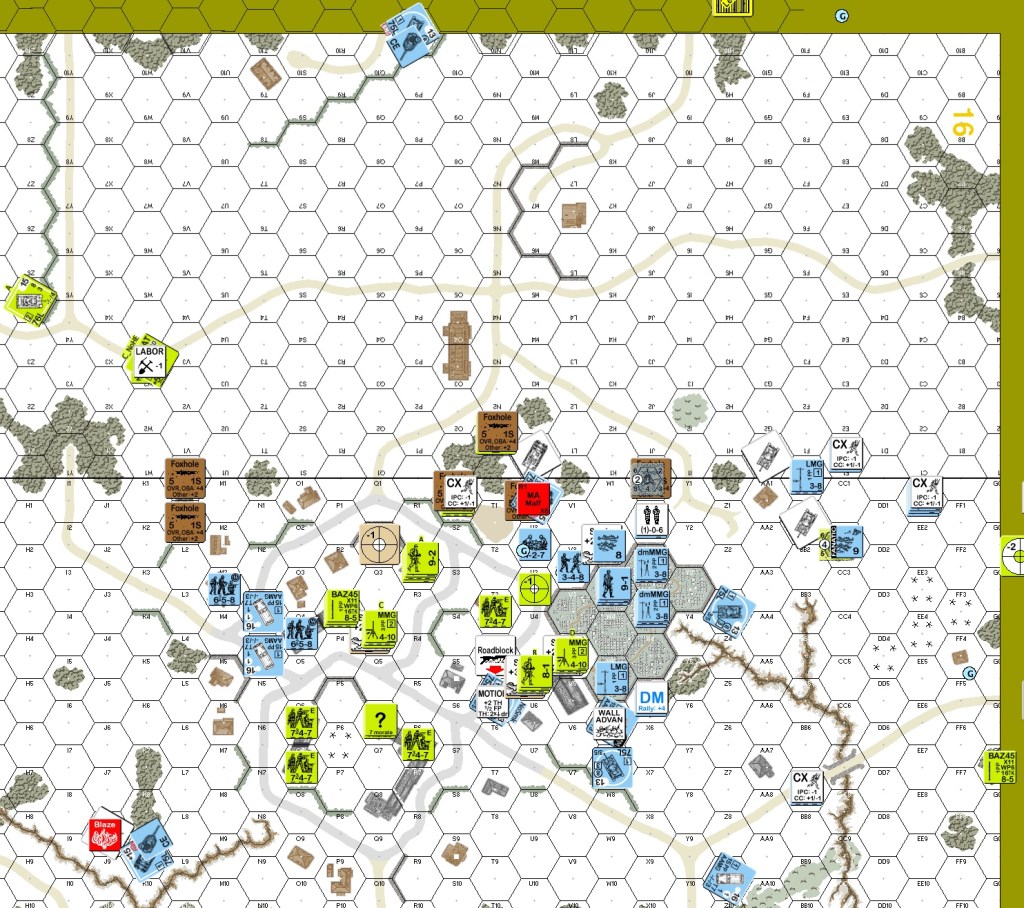
German turn five saw units moving through the graveyard to reach building 12U5. A squad with a 9-2 put down infantry smoke and assault moved adjacent to a 747 with MMG. The squad ended up broken, and the MMG put out a firelane. Another squad moving through the FL took a MC and rolled a 12. One leader, one squad and two HS made it either into that building or closer to it. The tanks moved to positions from which they could try to suppress the American firepower. An activation of the American sniper during defensive fire broke a 658 not yet in the graveyard. One of the squads west “behind” the Americans was broken by a leader-squad-MMG FG. This was very bad for the Germans because they had no leaders in that area. An M10 using APCR shocked the Panther that had a malfunctioned MA. In the APh, one leader and squad went for CC against a squad in building 12U5. They ambushed and eliminated the 747.
In American five, the shocked Panther recovered. That Panther then received three consecutive shots from the M10. The first shot with APCR rolled up a dud. The second shot was “no APCR”. The AP second shot, hit and did not penetrate. Same for the third. The HMG team caused some pins. A few squads moved to get away from point blank fire. German defensive fire broke the remaining American units in building 12U5, a leader and squad. German tank fire was ineffective, save for the earlier mentioned Panther using its MG to shoot at the M10 crew; it stunned the crew. The lone good order German squad in the west got lucky, breaking a 747. During rout, the broken American leader and squad in building 12U5 risked interdiction. The wounded leader rallied on a DR of two, but the squad became a HS. We missed that the two of them should have surrendered. My broken squad in the west was in a rowhouse, so an American stack moved from adjacent to do CC. A 747 also went into CC with the aforementioned Panther and immobilized it. Amazingly, the hero-squad combo missed killing the broken German squad, so went into melee.
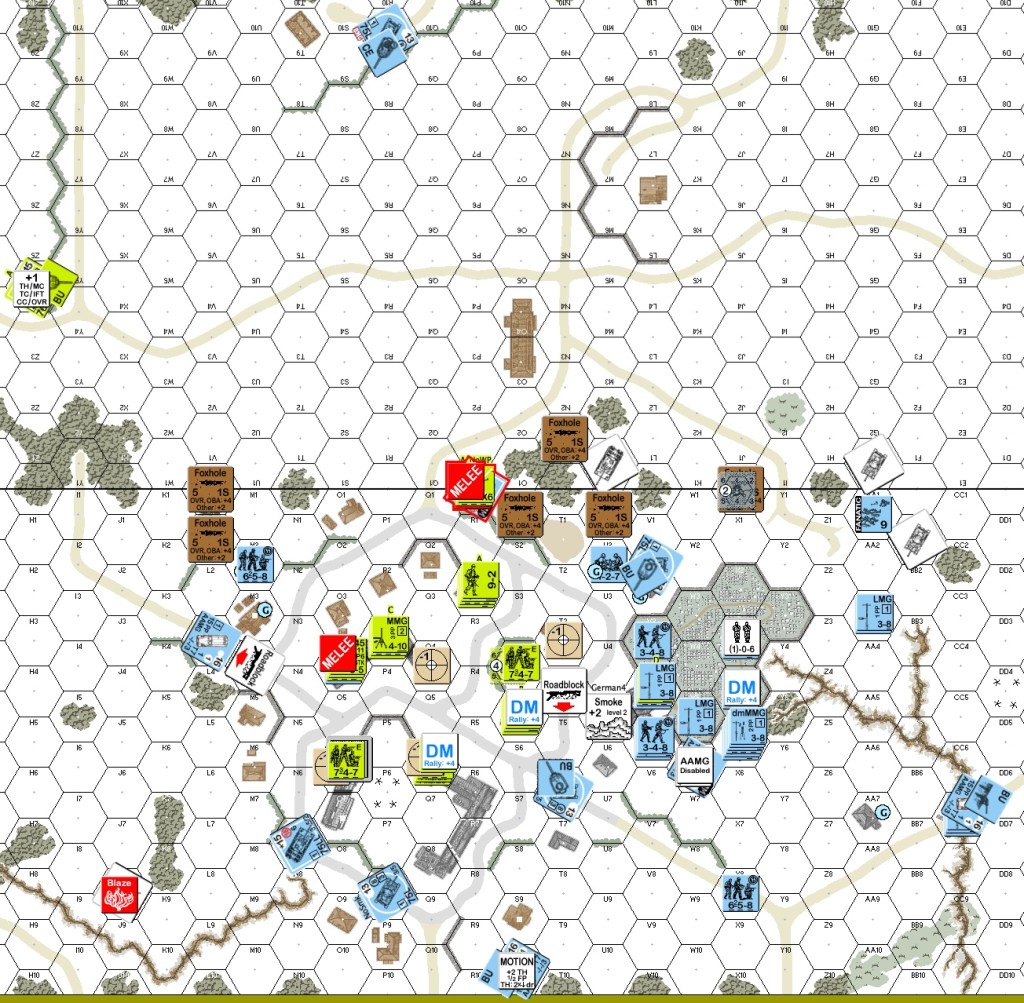
On German six, a fanatic SS squad failed to roll a ten to self-rally; another bad omen. One Pz4 put down smoke; a second prep fired to pin a 747 and break its MA. Two other tanks fired a American units and received pinned units as a result. I couldn’t bypass one unit to freeze because it was on level 1, so the tank would’ve needed to be CE. The other Americans were a leader and squad stack, which I considered too risky to bypass. I fired the far away center Pz4 in the north. I don’t remember why I thought that was better than moving. Looking at it now, I feel that Pz4 should have moved. I had a tank crew survivor mop up the 12U5 building. In movement, I had a squad-leader stack roll a six on a smoke placement attempt to end their move early. Two half squads grabbed two more buildings in the center south. My only squad in the west tried to do the same, but ran into a HIP HS bazooka team, thus ending its movement before grabbing anything. That HS also fire and broke the squad. Other American defensive fire was ineffective. German advancing fire broke one 747. An American squad that self broke to get away failed the interdiction MC to become a HS that reached a building. The Panther in melee rolled a casualty reduction on the squad attacking it. The melee with the broken German squad unsurprisingly ended with its elimination.
It was at this point I decided to concede after sizing up the situation. I had six good order squad equivalents in the town, with four tanks in support. The Americans had 5.5 good order squad equivalents. I had taken only eleven buildings and there was a good chance I would lose two of them in the west. That would leave me needing thirteen more buildings. There were only two more German turns and I could not be too reckless with my tanks since I needed to have three mobile at game end. I will often play until it is no longer mathematically possible to win, but I have also learned to be courteous about not making an opponent to play longer than really makes sense. I judged my chances of success so slim that it did not make sense to me to continue.

So, what went wrong with my attack? Most obvious, I think, is that the Germans took too long to reach the town. The debacle in the northeast woods early on delayed many important units like the 9-2. One needs to send units there to confirm that German flank is safe from AT guns. I kept the loaded halftracks behind until I knew where the nearby AT guns were. Perhaps I should have risked them moving with all the tanks on the assumption that the AT guns cannot shoot everything (unless they get a lot of rate). Maybe tank riders are needed. I would still want one or two tanks parked in the center north to prevent an M10 from moving into the flank of the German attack, and to smoke level two positions.
Discover more from Low Ammo
Subscribe to get the latest posts sent to your email.

As usual, nice detailed aar.
Thanks
LikeLike