
The big attraction for me of this scenario is the opportunity to use German equipment against the Germans. On one side is the Bulgarians with six Pz4 tanks and three Sdkfz 251/1 halftracks. Also on their side are thirty squads (6×537, 24×347), three MMG, four LMG, 100mm OBA and Air Support of two FB with bombs. They have six trucks if it happens that someone wants to zoom across the map.
This semi-awesome Bulgarian force is after all the level three and four hill hexes on board 50 held by a German SS force. That force has thirteen elite squads (548) with a HMG, two MMG, three LMG, two 20mm Flak 38 guns and two DC. That’s the frontline force. The backstop is three 88mm Flak 18 AA guns, manned by 127 crews. This flak battery is new to the idea of ground attacks, so must use red TH numbers by SSR. The Germans can use HIP for up to two squad equivalents.
This scenario, designed by Brian Martuzas, appeared in Armies Of Oblivion. It is set in Serbia. The date is 14 October 1944. The Germans are trying to hold open an escape corridor for other units. I played the updated version that came in second edition reprint. The updates removed a squad, LMG and light mortar from the Germans. Be aware there is errata to SSR 1 that has the Overcast weather starting on turn eight, rather than turn five. ROAR shows this version having three German wins to no Bulgarian victories.

My plan was to use all ten turns of the scenario to accomplish the mission, even delaying the entry of some units, since the scenario allows it. I wanted to preserve the Bulgarians for the long haul. I focussed my attack on the left side of the map. I knew, however, that I would need to sacrifice at least one tank just to find out where the 88s were. Normally with six Pz4, I would bring them on and then fire smoke to cover my troops. I could not easily do that here without exposing the tanks to the 88s.

The Germans must defend from one end to the other until they find out where the Bulgarians enter. Below is their entire revealed setup.
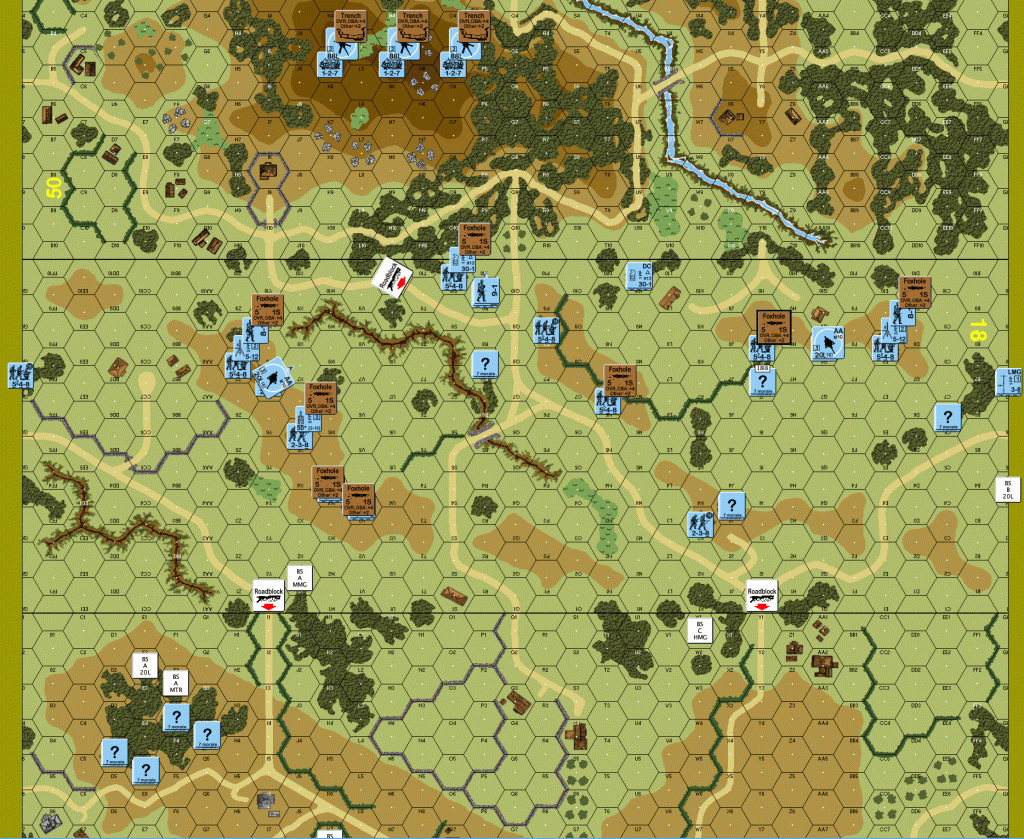
I decided to enter on the left side because of the blind hexes to the level four hexes.
Bulgarian turn one: The obvious first turn mission was to determine if the nearest Germans were dummies or real. A lot of Bulgarian units moved towards the concealed Germans without losing concealment, which gave a good hint. Of course, the German HIP prevents reckless running around in stacks. A Pz4 went to the right along a road. The intention was to reach a location from where it could put smoke somewhere useful, or, reveal an 88. It achieved the latter. As a bonus for the Germans, the Pz4 moved into the bore sited location where the 88 hit it and eliminated it. The 88 kept rate and had an opportunity to fire at another Pz4; luckily for me, it missed.

German turn one: Not much happened. A few concealed units pulled back. Bulgarians eliminated one dummy.
Bulgarian turn two: More infantry came on board with a couple of empty halftracks. Everyone pushed forward with half squads taking the biggest risks. One HS broke and ELR’d. The leader with the radio entered the board carefully in the middle with the sniper protection of two HS.
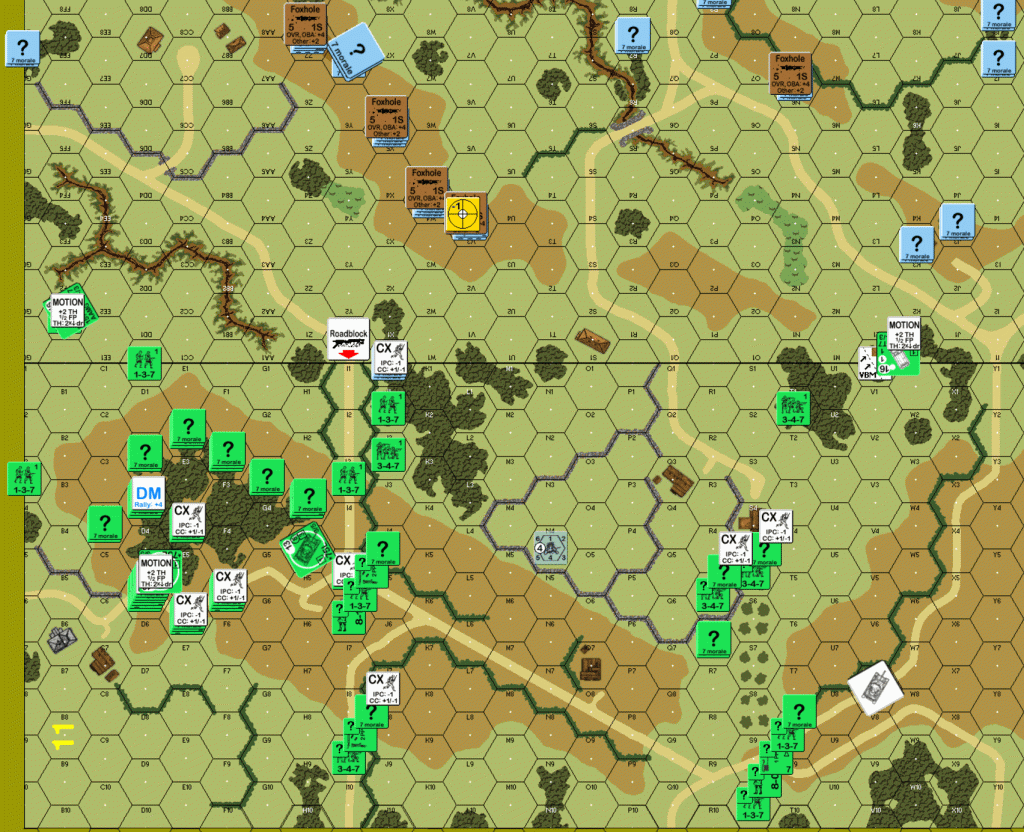
German turn two: A German light mortar in 18X5 had fun shooting up Bulgarians in the woods around 11F2. At least the German MMG broke. No German units moved. A Bulgarian Pz4 (11H4) rolled a low TH and low effect to eliminate a German squad in 18V3. The first fighter bomber went after the only visible 88. Its MG broke the crew during the first part of a point attack, but triggered a sniper the broke a 347 in the center of board 11. The rest of the point attack MG fire eliminated the crew. The second FB went after the light mortar of death. It missed, but caused a nearby Flak 36 to go into AA mode to take a few ineffective shots and lose concealment.
Bulgarian turn three: the rest of the infantry, a halftrack and a Pz4 set up to come in. The Germans repaired their broken MMG. I started the OBA module, even though my observer was just barely on the board. I believe my intent was to target the 88s in the hills while staying far enough away to keep concealment. Only the Pz4 that could target some Germans on level one fired; just obtained an acquisition. HS ran out first, followed by an empty halftrack up the left side. The first 347 moving up through woods near the left road found the MMG bore sighted hex; squad broke and ELR’d. More HS followed. A second halftrack ran up the middle road, surviving a MG ordnance attack. A Pz4 entered on the right flank and tried to stay in blind hexes. Some infantry ran into the gully on the left for protection. The large number of units running around was a bit of protection in itself. After the advance phase, I had two MMG with an 8-1 leader in the 11I6 stone building. Sometime during my turn, my opponent realized the other two 88mm guns needed to come on board concealed because they were not in concealment terrain.
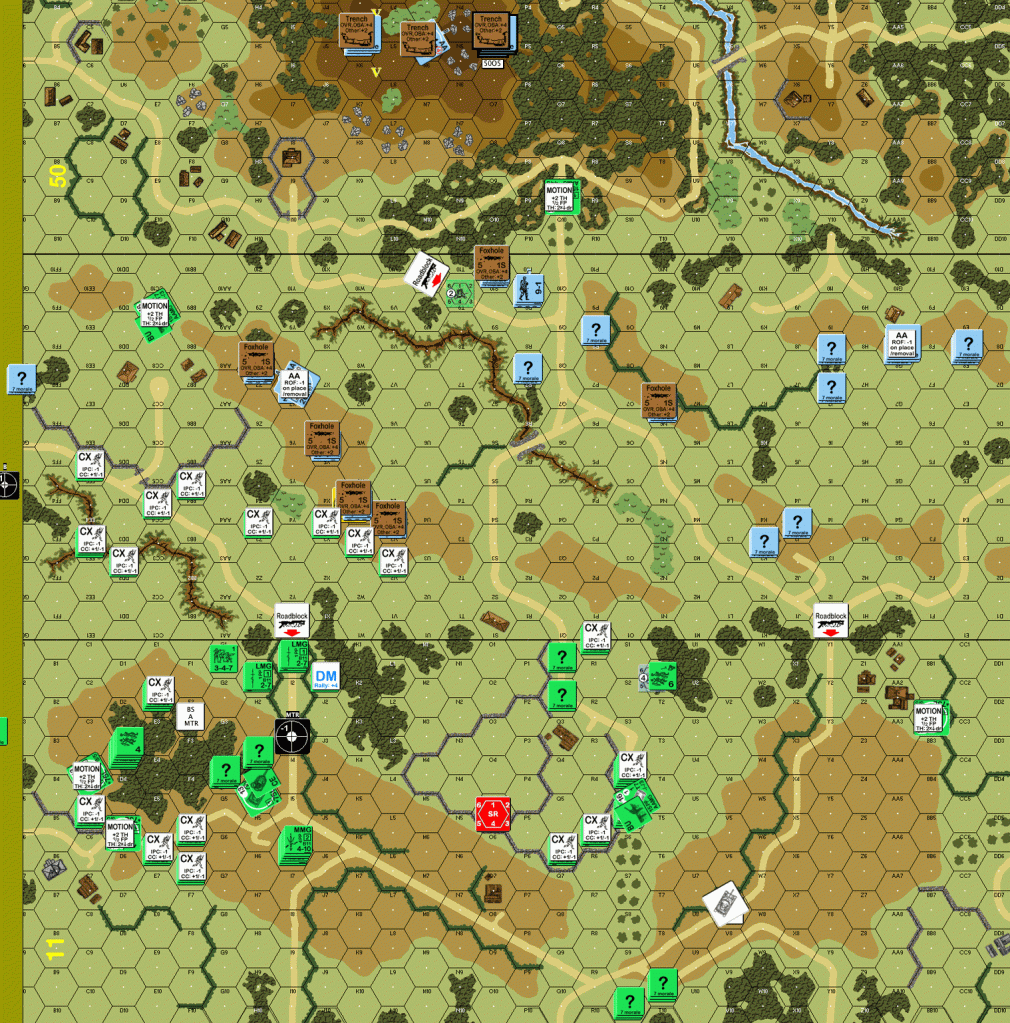
German turn three: prep fire on the left was marginally effective. In the centre, the crazy halftrack had gone CE to protect itself from being approached. The nearby German HMG immobilized the halftrack and the crew abandoned it. The HMG squad then broke the crew. Now that all the Bulgarian infantry and tanks were on the map, the Germans started moving from the north to the hill. Some Germans moved to eliminate the broken crew for FtR. The Germans declared No Quarter. Both Bulgarian FB failed their sighting TC.
Bulgarian turn four: One broken Bulgarian HS twelved itself out of the game, the rest rallied. The OBA radio broke. Other prep fire was ineffective and one MMG broke. The lone halftrack on the left continued on its mission to somehow disturb the 88s. A Pz4 continued its move up the right flank. A lot of infantry ran forward across open ground. More made it than didn’t. The empty trucks came on board in case I could use them later. German final fire broke a couple of MMC. An advancing fire Area Target Type shot from the Pz4 on the right scored a CH on a nearby Flak 36. Nothing else good happened in that phase.
German turn four: Point blank fire of a German squad on the 18W4 hill with LMG broke the Bulgarian units that had a foothold there. A lot of nearby prep fire was ineffective. German units continued to move toward the victory hill hexes. The Bulgarians defensive fire had good rolls, but the German MC were almost all passed. Only a Flak 36 crew broke. A follow-up air attack eliminated the crew.
Bulgarian turn five: A repair roll removed the broken Bulgarian MMG. Prep fire did nothing. The crew of the halftrack that got on the hill near the 88s abandoned the halftrack and took the LMG with it. A lot of infantry on the left once again ran across open ground. Again, more made it than didn’t. Three Pz4 tanks moved up on the left. One 88 targeted one of them; it missed twice. One Pz4 took up a HD position behind a roadblock. Several squads in the center moved up. The Pz4 on the right took the long way around, risking a shot from a second 88 that missed. I moved a 537 squad and a halftrack into the same hex for later loading. German final fire broke a couple of squads in the center. In the advance phase, the Bulgarians established a strong presence on the 18W5 hill.
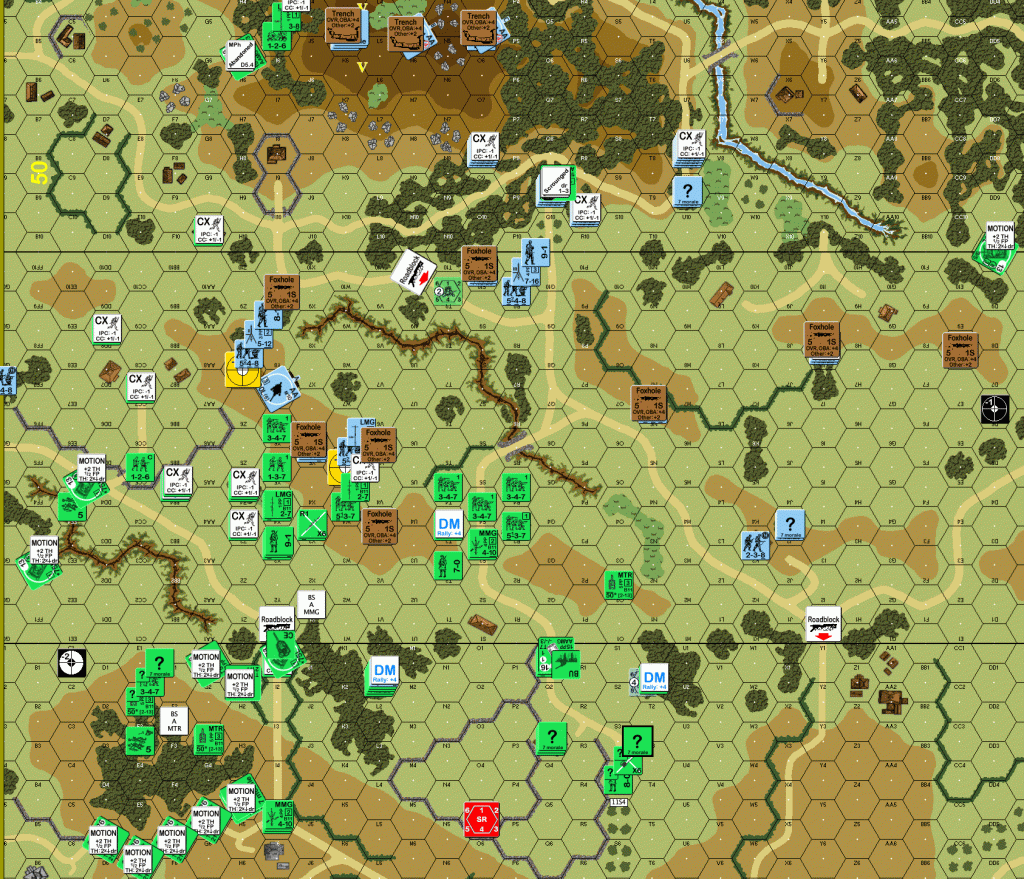
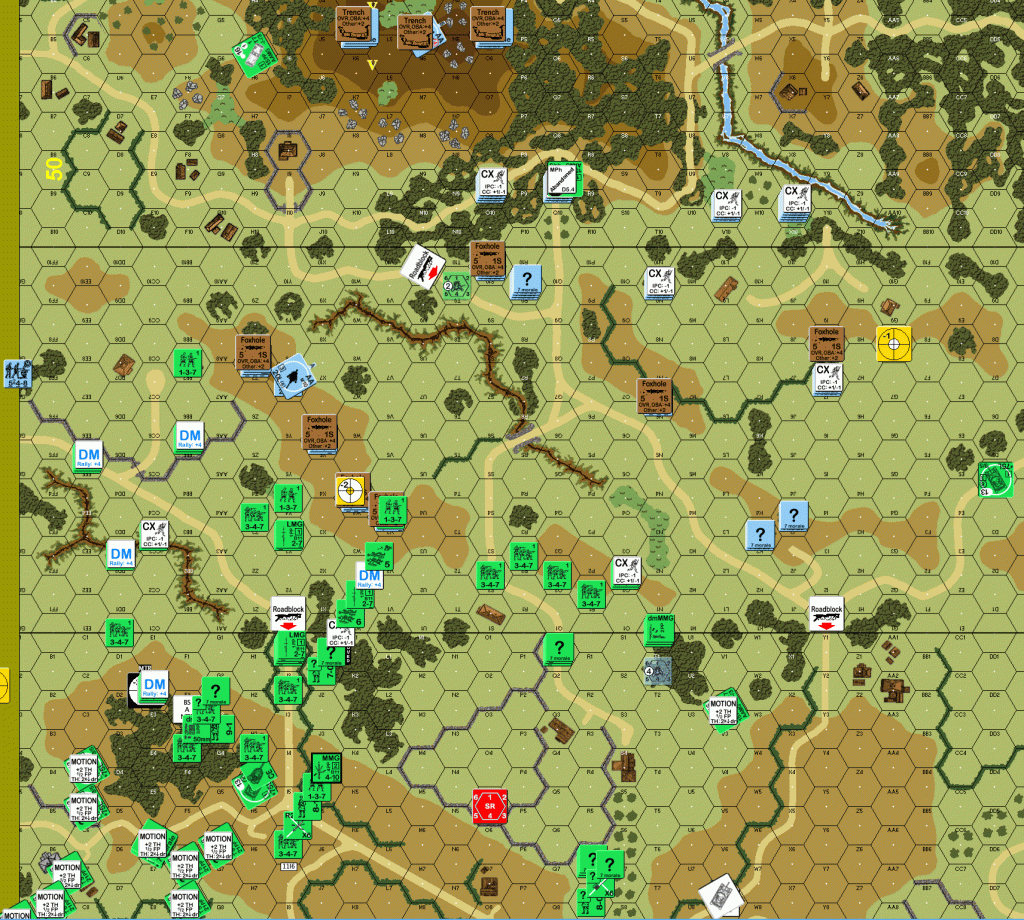
German turn five: One 88 broke a squad on that 18W5 hill. The other 88 turned to fire at the Bulgarian crew approaching it. It missed, but that crew would need to find another approach. The center HMG team broke a center Bulgarian squad. In the MPh, the German mortar team on the 18W5 hill was able to retreat, despite several DFF attacks; the LMG team also escaped harm as it left. The MMG team in the level two foxhole was pinned as it tried to leave. More of the north side Germans made it to the victory hill. The disappointing Bulgarian final fire included a CH on the MMG team that still did not break them. After all that, the MMG team voluntarily broke.
Bulgarian turn six: The Bulgarians skip prep fire. Several left side Pz4 tanks moved closer to the hill, getting shot at by both 88s that missed. Since the 88 crews had fired, the Bulgarian crew on the hill tried to move closer. A nearby 548 fired at it and broke the crew. The left side infantry moved up with few problems, but the hill seemed still far away. The center infantry suffered several breaks trying to move forward. I loaded a 537 onto a halftrack. It traveled up the middle. They tried to BFF an opening without success. The right side Pz4 moved closer to the hill and approached what was probably a dummy. Advancing fire didn’t break any Germans.
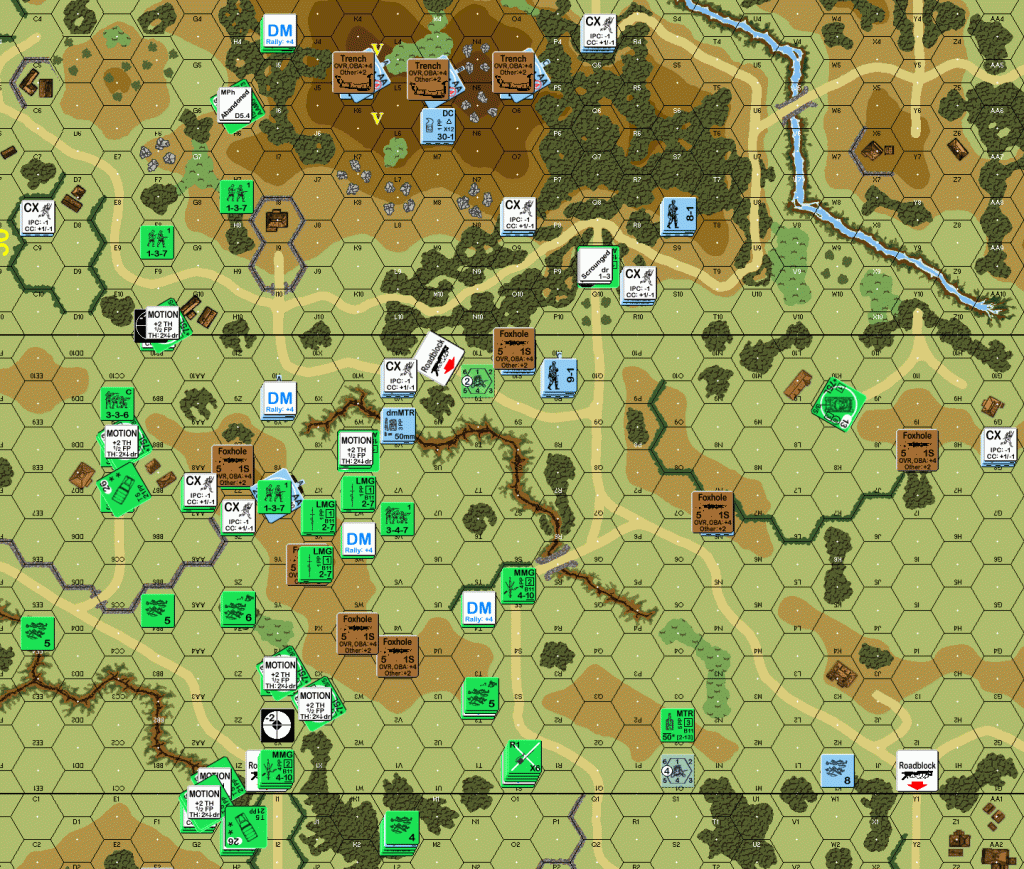
German turn six: The Bulgarians finally repaired the radio. A Bulgarian HS recovered the Flak 36. An 88 eliminated a motion Pz4, but did not keep ROF. The other 88 went after the loaded halftrack; it took three shots to eliminate that as a burning wreck, so no passenger survival possible. The 88 still had ROF. It went after and broke an LMG team on the 18X5 hill. The 88 still had ROF. It went after another LMG team on the same hill. After several shots, it hit and caused casualty reduction. The HS passed the MC. The 88 hit it again and broke the HS this time, AND KEPT ROF. The 88 went after another LMG team behind the burning halftrack and finally missed without keeping ROF. The central 18R9 HMG team fired at the same LMG team. The LMG team passed the MC; the HMG had ROF, so fired again. The LMG team broke. The HMG had ROF, so attacked a nearby squad; broke them. The HMG kept ROF, so attacked the MMG team in the center and broke them. It still had ROF, but finally rolled to high to keep it. Prep fire was finally over. German movement happened largely far away from the Bulgarians. Only one squad was pinned by the right side Pz4. The Bulgarian HS with the Flak 36 tried using it, but only eliminated it. The OBA came on board as a spotting round near the 88s.
Soon after this, I decided to concede. The Germans had moved a substantial number of units to the victory hill. Most of my leading attackers were broken. I still had four tanks and about seven good order squad equivalents, but even more broken troops. It just didn’t seem likely that my Bulgarians would have time to get to the hill, get up the hill, and take it from the Germans in the four turns left. I wrote this AAR from several log files created over a year ago. I was the person who generated the errata regarding the Overcast SSR. Unfortunately, I did not receive the reply in time for our game, so we played it as printed; therefore, I had air support for only a few turns. As mentioned, the radio broke after its first turn on board and didn’t repair until turn six. We were using the Pleva OBA rules.
I’m curious to hear from others about other attack plans for the Bulgarians.

Discover more from Low Ammo
Subscribe to get the latest posts sent to your email.

Good AAR.
LikeLike
Very interesting AAR. German set up pretty far forward and it worked.
LikeLike