This 1944 scenario takes place on the island of Angaur, which I of course needed to use Google Maps to find. ROAR shows 26 Japanese defender victories to 25 American attacker wins. It has a player rating of 6.3 in ROAR and 6.7 in the Archive. Unusually, the scenarios features American army units, rather than marines, in the attack, and the American troops are only first line, with the exception of two half-squads to operate a FT and DC. Peter Shelling designed the scenario; it has another of his multi-faceted victory conditions that make the game play more interesting.


Historically, the Americans are trying to get into a town being held by the Japanese. Pete simulates this by awarding VP for Good Order American units in buildings west of a road that bisects the board village. The action takes place on halves of board 10z and 67. There is a cap of 25 CVP on the Americans. The Americans must have more VP west of the road than the Japanese at the end of any game turn. The Japanese also obtain bonus VP by delaying the Americans (1 VP at the end of each game turn if there are no Good Order Americans in any board 10z building) and by hanging onto the board 67 buildings (1 VP at the end of each game turn in which one or more Japanese non-hidden units are in a board 67 building).

The Americans start with almost half of their infantry on board. The armour and the rest of the infantry enter on turn one from the east. The total assets come to fourteen 666, two 347 HS, four SMC, four MMG, one BAZ 44, one 60mm MTR, one FT, one DC, two M4A1 and one M8 HMC. Obviously, the Americans need to be a bit cautious with their armour because of the CVP cap.
The Japanese defenders have three 448, six 447, three SMC, two MMG, two LMG, one 50mm MTR, a 47L AT gun, a 20L AA gun and 24 factors of mines. The scenario also gives Booby Trap Level B to the Japanese and four Fortified Building Locations. During this match, I did not see a single Booby Trap event.
PTO terrain is in effect with light jungle, brush as brush and roads existing. All buildings are wood with only a ground level, no rowhouse black bars, and huts exist.
Since the Americans start on board, I chose to use the given concealment counters to protect the units that needed to set up where the they could be shot at. I converted two FBL into tunnels. I used one to connect two of the rear buildings. I used the other in an attempt at keeping a Japanese unit on board 67 as long as I could. I put a HIP THH in a building with a narrow road in the hope of catching an AFV. Building 10zY7 was the Japanese Alamo position. I placed one Japanese leader with a squad to be able to deploy. The Japanese must defend edge to edge. I thought my opponent would concentrate on one side to overwhelm the defence, but he chose to attack on a wide front. Granted, working with a nine hex front could be difficult with the amount of American troops.

Here is the same image after applying the concealment and HIP.
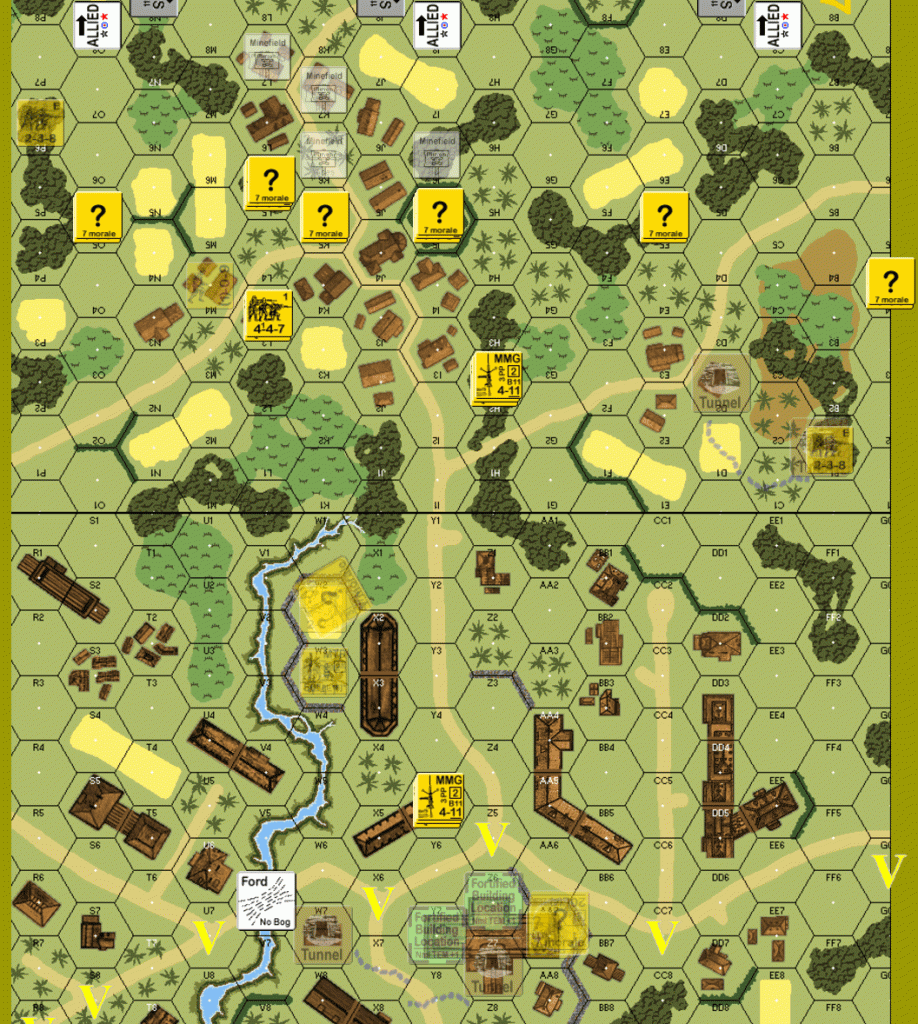
The American setup:

American turn one: They start unlucky, achieving only one of four deployment attempts. That meant the squads had to find the mines. They find the mines in L7 and K7 with one squad breaking. The HIP HS on the left breaks a squad with PBF. No other defensive fire or advancing fire has an effect, except for a sniper wounding an American 7-0 leader. During the advance phase, a HS finds another AP6 mine and breaks.
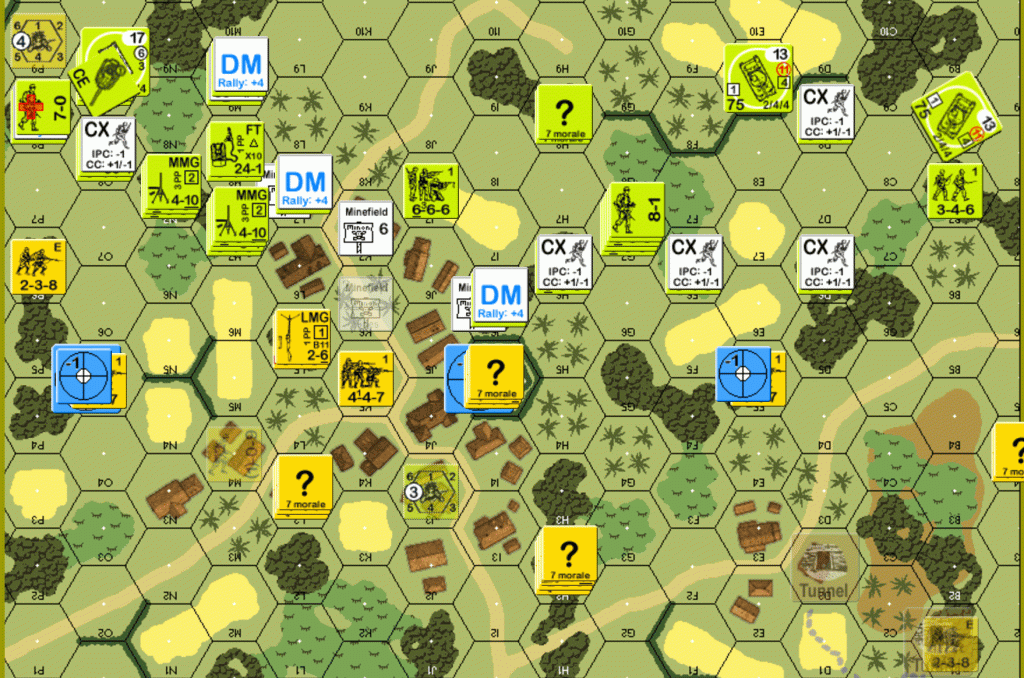
Japanese turn one: They deploy an additional squad. No American unit rallies. From the only prep fire, the broken HS in a minefield eliminates itself by rolling a twelve on a MC. The rest of the Japanese strategically withdraw. American defensive fire breaks a HS, which is able to rout back to a leader position. The Japanese earn two VP at the end of turn one.

American turn two: Both sides rally all their broken units. A Sherman puts out some WP in an empty hex. As the infantry moves forward, defensive first fire breaks a HS with the BAZ and two squads. The squad in a minefield breaks trying to leave it. Advancing fire reduces a Japanese squad to a HS. During the rout phase, two American squads are able to rout forward a little bit; one of them was formerly in the L7 minefield. A Japanese HS self-breaks to avoid CC at unfavourable odds. American advances eliminated the HIP THH.

Japanese turn two: They rallied their broken HS; the Americans rallied nothing. All the Japanese pulled back. One squad was striped and later pinned. The Japanese earn two VP at the end of turn two to give a total of four.
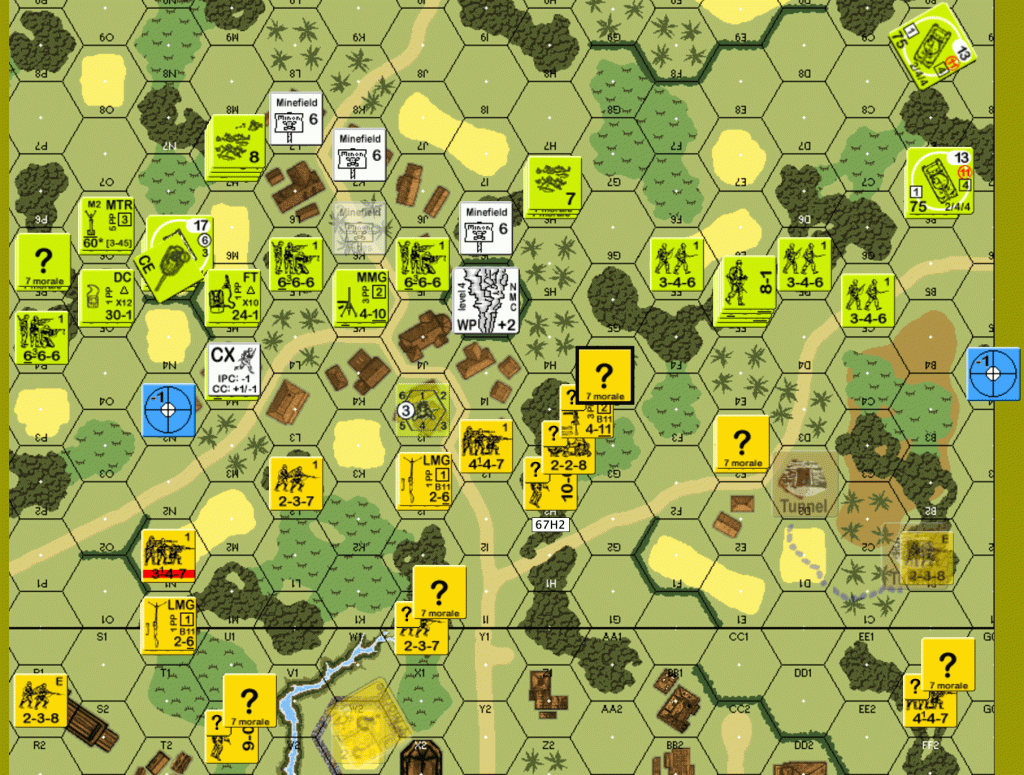
American turn three: American rallies are about 50% successful. No prep. The first American move of a HS on the Japanese right triggers DFF and a firelane from the centre MMG. That HS is pinned, but a follow-up HS walks through it and almost into the HIP Japanese HS on the tunnel entrance. An American HS uses armoured assault with a Sherman to move through the firelane, but breaks anyway. The Sherman continues on and parks adjacent to that same Japanese HIP HS. More units assault move into the FL next to E3 and a concealed Japanese squad. Its defensive fire breaks the first unit, but it cowers. The follow-up unit is unharmed by the FL. On the Japanese left, every American move is met with defensive fire; only one HS breaks, but several squads pin. Advancing fire pins several Japanese units. The Japanese unit in E3 is striped and pinned. During rout, once again a Japanese HS self breaks to avoid an unfavourable CC. During advances, an American HS advances into the hex containing the HIP Japanese HS in 67B1. I decided to decline CC and keep concealment, hoping it would help save the bodies. I can’t remember why I thought that was the better idea. Maybe because my attack would have been one to two, although the DRMs probably would have been favourable. I’m disappointed that I won’t be able to use the tunnel; there are too many nearby Americans.

Japanese turn three: No prep fire. Most units do a one or two hex withdrawal. A few go further. American defensive fire eliminates a leader when it rolls a twelve on a MC. The Japanese earn one VP at the end of turn three for a total five.
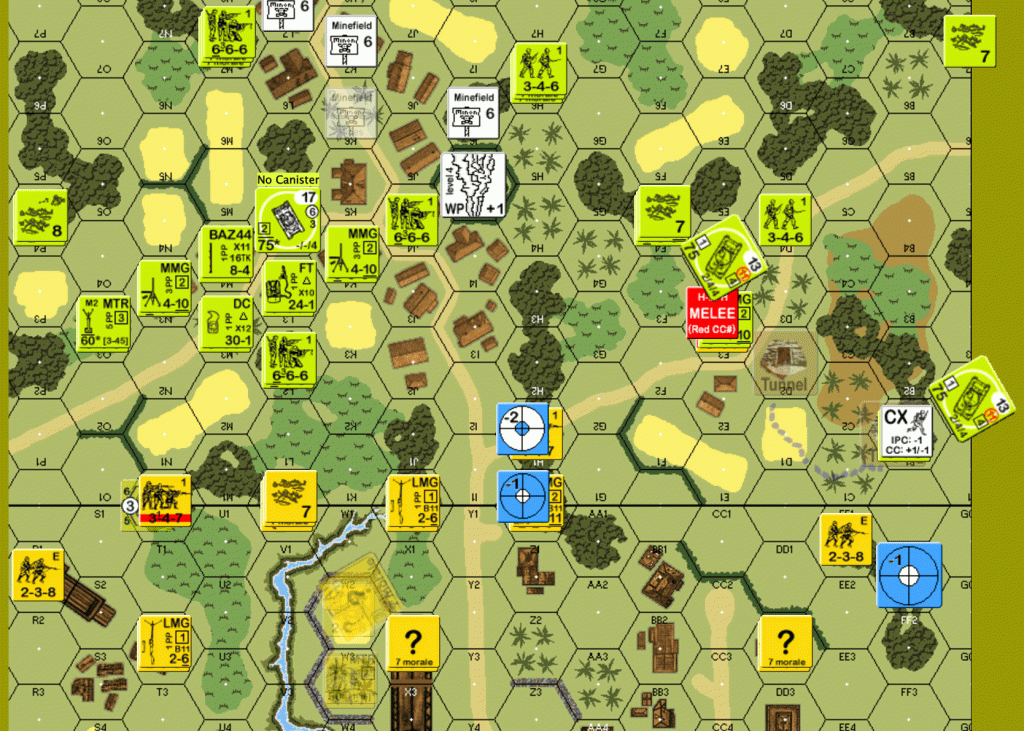
American turn four: The mortar team, an MMG squad and the M8 prep fire without effect. The front line Americans in the north (left) move first. They make progress and suffer a couple of pins. A Japanese HS breaks using FPF. The center and right side attack moves forward as well, but a HS and squad break to defensive fire. Both Shermans move adjacent to Japanese units, but they have infantry support. The Japanese MMG that had kept rate during the MPh, fires at an American MMG squad during final fire and breaks the squad. The AT gun comes on board to fire at a two squad stack at a range of two hexes. I roll a twelve! Advancing fire breaks the Japanese HS on the right and eliminates a center squad with a PBF KIA.
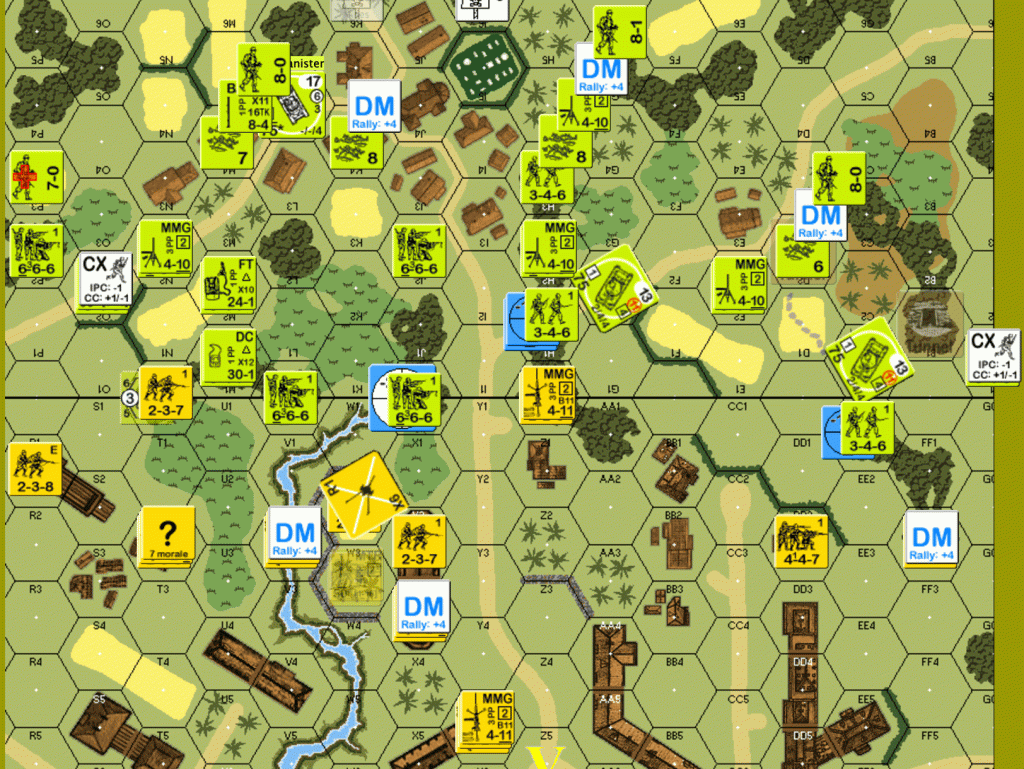
Japanese turn four: The crew fails to repair the gun. Only the Japanese unit with a leader rallies. There is no prep fire. Most units pull back one or two hexes. One HS on the left runs further back. The Americans take a couple of shots and pin the forward MMG team. The crew of the broken gun moves back a hex and the HIP squad in that location drops its mortar and advances forward a hex. That is legal; dropping the SW is a one of the few excepted actions for concealment loss activities. The Japanese earn their last VP for a total of six, although I didn’t know it would be their last VP.

American turn five: Two out of three American brokies rally; a Japanese leader brings back one HS. Only one squad prep fires to no effect. The moves on the south side go well because there are not many Japanese units there. On the left, however, one squad is eliminated by a KIA and the DC HS is eliminated when its MC is a twelve. Advancing fire on the right (south) side eliminates the broken Japanese HS. The Japanese sniper puts a small stun on the M8 HMC. Several American units advance adjacent to the enemy; one HS advances into CC with the center Japanese MG crew. A melee results. The Americans are now in a building on board 10z, thus denying more VP for the Japanese.
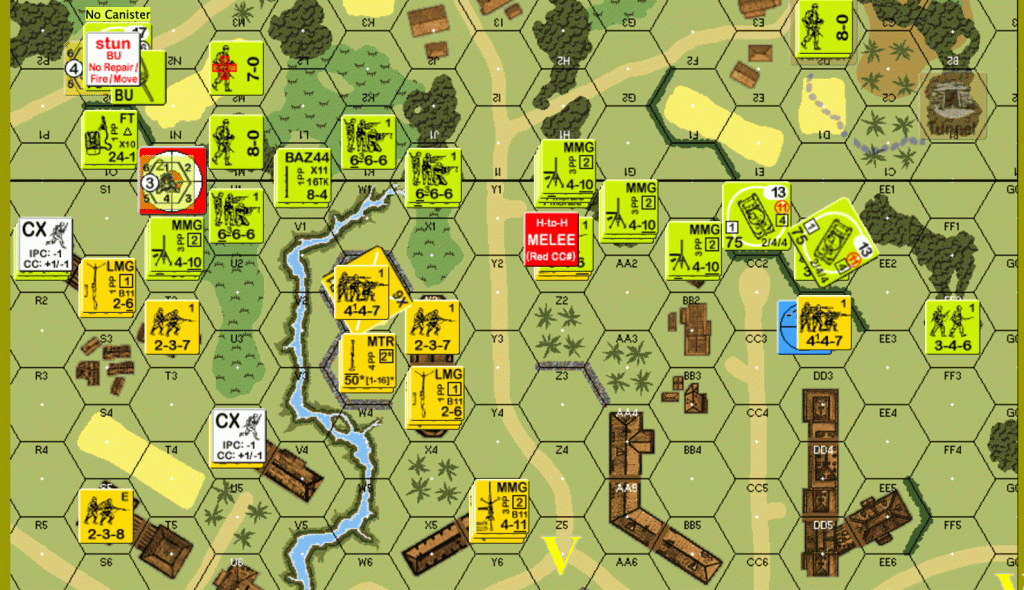
Japanese turn five: an American rally turns into a Berserk HS. No prep fire. As the Japanese pull back, they lose a HS on the left and suffer a break in the center. Final fire stripes and ELRs a squad on the right. Japanese advancing fire breaks and ELRs an American squad. The center CC ends in mutual destruction.

American turn six: No rallies to do for either side. A Sherman breaks its MA trying to fire smoke. An MMG squad stripes a Japanese squad in the centre. The berserker charges, but cannot reach anyone. Troops on the south side make good progress against the sole striped Japanese squad. The troops moving in the center and north suffer a few broken units and a pin. In final fire, the center Japanese MMG team breaks and then eliminates a HS. Advancing fire eliminates a HS on the left and encircles the squad on the right. The Japanese sniper breaks a squad. The north side attack looks a bit feeble at this point. On the right, an American squad advances into CC against the encircled squad. A melee results.

Japanese turn six: American rallies go well, but two units have no leader. The MMG team and the AA gun fire at units in the south to no effect. Several HS and a leader move west of the victory road. The center squad stays put and survives American defensive fire. The center crew hides in the stream. The center squad and crew advance to new defensive positions. The south melee goes to the Americans.
American turn seven: The south Sherman puts WP on the AA gun. The Sherman without MA moves to freeze the fire of the MMG team; CC Reaction Fire is ineffective. The AA gun breaks trying to fire out of the WP at Americans crossing the victory road. On the north side, American units are again unsuccessful in pushing forward. An American squad, HS, leader stack are able to move adjacent to the MMG team in the center. In the south two stacks of American infantry cross the victory road. During the advance phase, American units advance into the locations with the MMG team and the AA crew; ambush allows the MMG team and crew to withdraw, which I should not have done. What the heck was I thinking? If either Japanese unit had kept the Americans in melee, they would not have counted for VP.

It is now game end. The Americans have nine VP of Good Order infantry in buildings west of the victory road. The Japanese have eleven VP of Good Order infantry plus the the six bonus VP, so the Japanese win.
Discover more from Low Ammo
Subscribe to get the latest posts sent to your email.
