
My opponent chose this scenario based on having seen it on a tournament list. Designer Stephen Johns brought us yet another Battle Of The Bulge scenario. A reconnaissance force from Kampfgruppe Peiper probes north from the main group. The action takes place between two towns in Belgium: Büllingen and Wirtzfeld.

The German attackers want to control all building/rubble hexes in the American setup areas. The VC actually state “area” but I believe that they meant “areas”. There is a CVP cap of 35, however, to prevent them for being reckless in their attack.
The battle takes place on board 9b with five overlays. North is at the top of the map. The Germans attack from the south.

ROAR shows 36 American wins to 13 German wins as of April 2025. This playing dates from January of 2023.
In the HIP setup area, the Americans have the following units: five 347 HS, one MMG, one 8-1 and two BAZ44. In the regular area, they have eight 667 squads, two leaders, two MMG, one 60mm mortar, one BAZ44, six concealment counters. and two M10 tank destroyers. One of the TD can set up HIP.
The Germans attack with twelve Waffen SS squads of the 658 variety with four leaders, one MMG, three LMG, two PSK, four Panzer4H tanks and three SPW 251/1 halftracks.
I had the German side. Deployment was compulsory of course, because of the HIP group that I needed to discover without losing too much CVP; especially the AFV.
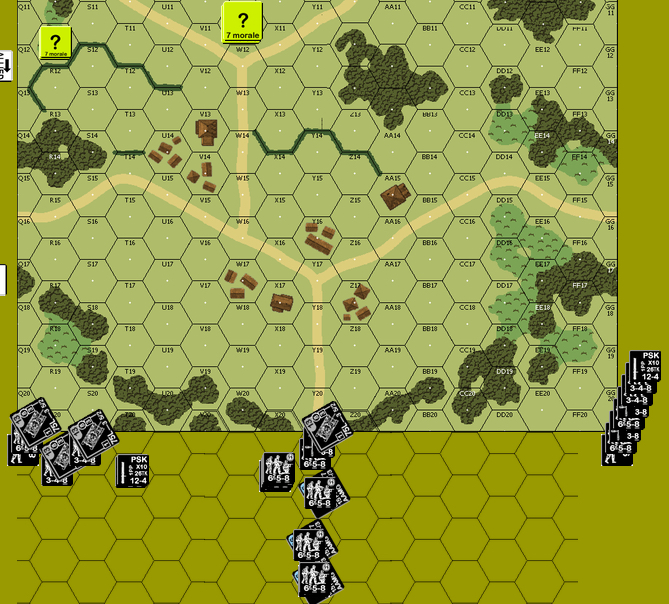
This was the American setup.

I can see now that my opponent decided to use the forward troops to inflict casualties, unlike many American players that I read about, who set up the forward troops to fall back to join the main body of American troops. I think there is some merit in what my opponent did, but those troops will probably not survive. I applaud using the concealments for dummy AFV, but I might have made less than three. I was surprised that one TD was pointing sideways rather than towards the enemy. The 76L gun will have little trouble with the Panzer4H tanks, so why not point it at the likely approach area. I was a bit surprised at seeing the two 667 squads stacked; its not something I normally do. The light mortar team is in an open ground hex. It could have been in one or two rear woods hexes in the setup area, but then the HS would have had more difficulty reaching the buildings. There is a 7-0 set up illegally between the two areas.
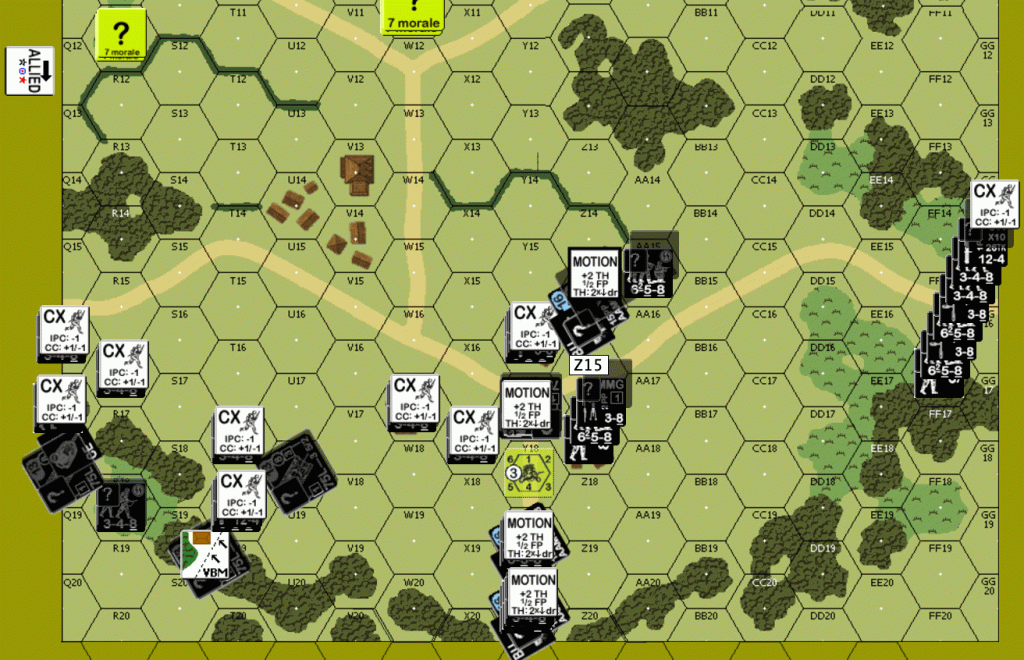
My plan for the beginning of the game was to send the infantry ahead of the AFV and protect the AFV at the beginning. Here is the German setup; all started concealed of course. I wish I could tell you a well defined turn by turn plan, but I have difficulty creating one.
The first German turn did not generate any reaction from the Americans. Every German unit kept concealment.
The first American turn was surprisingly uneventful; no firing and no moving. The Germans did some recon by fire. The found no units but confirmed that a couple of hexes were unoccupied. The Panzer4 tanks put acquisitions down for future smoke. On the following turn, two of the four Panzer4 tanks put out smoke and everyone else got moving. German movement on the left discovered an American HS with a BAZ in woods hex. German movement on the right found a HS in a brush hex that fired and eliminated a German HS. A halftrack in the middle unloaded and moved forward. When it rolled adjacent to a woods hex, an American HS with BAZ appeared and took a shot; the DR was eleven, no more BAZ. The halftrack then went to the right, attacked the HS in the brush and broke it. A German leader and squad on that side went left to get to those woods; they should have went right. They took a point blank shot from an American HS with an 8-1 leader to be eliminated. The rout phase saw the broken American HS surrender. There were two CC on the left and one in the middle. The American HS in the middle won the ambush to evade a two-to-one attack. On the left, a German squad eliminated a HS, and a melee resulted when an 8-0 with HS attacked an American HS.

The American leader MMG combo on the right was broken trying to retreat. During the rout phase, they were eliminated. The melee on the left continued unresolved.
During the third German turn, they moved forward semi-aggressively, trying to get smoke here and there. American defensive fire against the infantry breaks only one HS, but one of the tank destroyers eliminated a Panzer4. That same TD used intensive fire to destroy an empty halftrack that went exploring. Advancing fire encircled an American leader-squad-MMG combo on the left. The melee continued even though the Germans added another HS.
Later in the American turn as the left-side American leader-squad-MMG combo tries to withdraw, the squad is broken. German defensive final fire broke the leader as well. The Germans also break an American squad in the center. The melee ends in the German favour.

The only German prep fire was some smoke to protect a Panzer4 that was in the sights of the American TD. All the infantry moved forward and somehow drifted to the right. For the second time in the match, an AFV was saved by a high DR from an American BAZ TH. The German moved several infantry units near the unconcealed TD; near as in PF range, in BAZ range and in PSK range. All three were possibilities.

The Americans succeeded in self-rallying the broken squad under the TD, which allowed it to withdraw. The broken 7-0 also rallied, but he did not bring back the broken squad there. The TD started in reverse to get out of trouble. The PSK fired and missed. The captured BAZ fired and missed. The nearest HS tried for a PF and rolled a six. The TD escaped. After retreating one hex, the TD pivoted to start going forward instead of backward. The center Panzer4 took a shot through a burning wreck and rolled snake-eyes to burn the TD.

In the fifth German turn, a Panzer4 moved from the left to attack the center American squad. The squad survived, so the tank used VBM to freeze the squad’s fire. A second Panzer4 occupied another American squad near the center. Under time pressure now, some Germans on the right ran through the woods into concealed American units. Several broke. Other units were able to move up from the center and the left. One Panzer4 moved from the left towards the center, keeping out of sight of the TD, so it acquired the last buildings as targets. Advancing fire broke only one American squad; it was able to rout but it was pinned part way to its destination. The Germans advanced a PSK near the concealed TD. There were two close combats. In the center, two German HS went against a pinned squad with Panzer4 in the hex. Both sides rolled low resulting in elimination of the American squad and one German HS. In the right woods, a German squad took on an American HS resulting in a melee.

American turn five prep fire was ineffective. German defensive fire broke the center American squad. The PSK impressively destroyed a dummy TD. This was followed by another crazy result from a German leader-squad-LMG group firing at the first of the remaining concealed American stacks. The shot resulted in a broken 9-1 and a berserk squad. Another low odds shot broke the American mortar team that was in open ground. The German guard decided it was time to massacre its prisoners. In that one DFPh, the Germans chance of winning went from improbable to maybe possible. Although, I must wonder how the Germans will force the berserk American squad out of its building.

In the final German turn, their rally was less than ideal; only a leader and a HS rallied out of four non-DM units. The American leaders did not rally. The Germans did not prep fire. A Panzer4 moved right to occupy the American squad on the right. A second Panzer4 moved in the center towards the American buildings. The HIP TD finally appeared; it destroyed that Panzer4, but it did not keep rate. The crew survived. A German leader moved to bump strip concealment from the last concealed American unit. A halftrack carrying a HS moved to bypass the rear building. The squad in the building pinned on its PAATC. When the last Panzer4 started its engine, the TD took an intensive fire shot. It hit the Panzer4, but the TK roll was too high. The Panzer4 continued its movement to reach the building with the berserk American squad, where it went into bypass. The berserk squad made a CC attack and rolled boxcars. The remaining German infantry ran towards the two buildings. The final halftrack, which was carrying a squad, moved up and unloaded adjacent to a building. In the AFPh, the berserk squad was encircled and shot at twice; it failed both MC to disappear and disappoint. German fire at the second building broke the remaining squad to seal the win.

I will not hesitate to admit the dice won that match for me. The Americans inflicted 27 CVP, fairly close to the cap of 35 CVP. The pace that I pushed the Germans forward may he been a little slow, considering how much luck it took to reach the last victory buildings. Judging by the results, I see the attraction of pulling back the front American group to reinforce the back group. I believe that action will bring the Germans into a killing zone in front of the last two victory buildings.
Discover more from Low Ammo
Subscribe to get the latest posts sent to your email.

Looks like a very fun scenario. And a good win!
LikeLike