
This scenario (designed by Michael Koch) got onto my play list for several reasons. First, it has Canadians. They are from the North Nova Scotia Highlanders. In 1994, during D-Day remembrance events at the Canadian War Museum, I had the opportunity to talk briefly with a 1944 member of that unit, which was a rare thing for me. Second, it has combined arms on both sides, including OBA with a phone. ROAR shows twenty German victories to eleven Canadian. ROAR also shows a recommendation of 6.5
The scenario date is March 25, 1945. The map is made up of four half-boards of four maps. By SSR, the grain fields are plowed. All the buildings have only a ground level, except for the overlay church. Its steeple is a level two location. The victory conditions require the Canadians to take at least five multi-hex stone buildings (the church counts a two multi-hex stone buildings). During this writing, I saw that we lost track of the SSR that stated all buildings have only a ground level, except the church. I need to remember to re-read the scenario card before every session.
The Germans are defending the town from two attacking forces. The defenders are setup in two groups: fallschirmjäger troops in the town and panzer grenadiers east of the town, guarding the road approach. The panzer grenadiers have seven squads, two leaders, a panzerschreck and several machine guns. The fallschirmjäger unit has eight squads, one half-squad, more machine guns, a 9-2 and the 80mm OBA. The troops have differing ELR; the grenadiers have an ELR of 3, while the fallschirmjägers have an ELR of 4, with underscored morale by SSR. There are three AFV (2 JgPz 4, 1 Pz4J) that can set up in either group’s setup area. Each group has five concealment counters.
The attacking Canadians are split into two groups. The group setting up on board have twelve squad equivalents, several MG, two light mortars and three Sherman 3 DD tanks. The DD tanks are at a slight handicap as they have no BMG. The group coming from offboard in the west have nine squads, several MG, one light mortar, a 9-2, three Sherman 3 and two Wasp flame-throwing AFV. The troops have an ELR of 4. Something worth remembering about the Wasp: its smoke discharger places smoke in the two adjacent hexes of its VCA. There is a lot of open ground for the Canadians to cross; the Sherman 3 tank has s8, WP6 and sD6 to hopefully mitigate that risk.
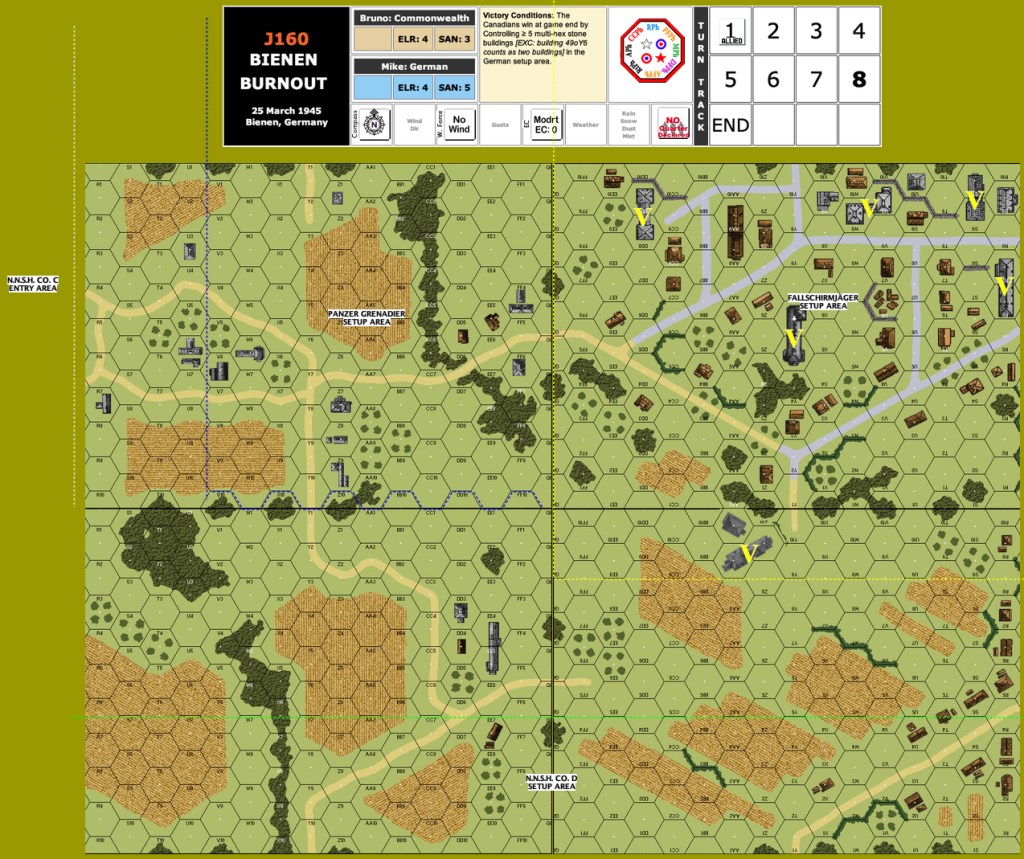
I had the German defenders. There are six multi-hex stone buildings, however, the church overlay building 49oY5 counts as two buildings. The Canadians need five to win. Therefore, the German Alamo could be in the to right corner of the map, where there are three multi-hex stone buildings. The church also has the only high observation point on the map, which is an attractive position for the OBA observer. It is also obvious, but at least the observer starts HIP because he has a phone. I decided to put the observer there to be able to place harassing fire on the open ground that the Canadians need to cross.
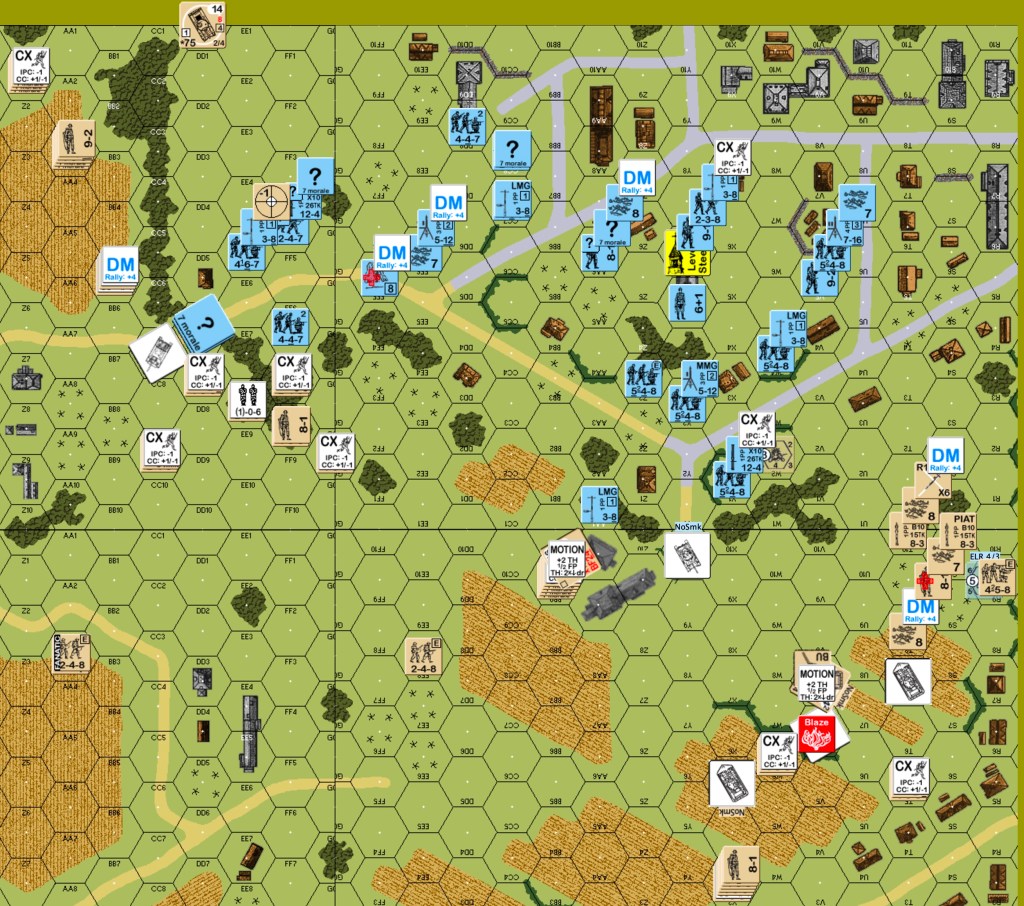
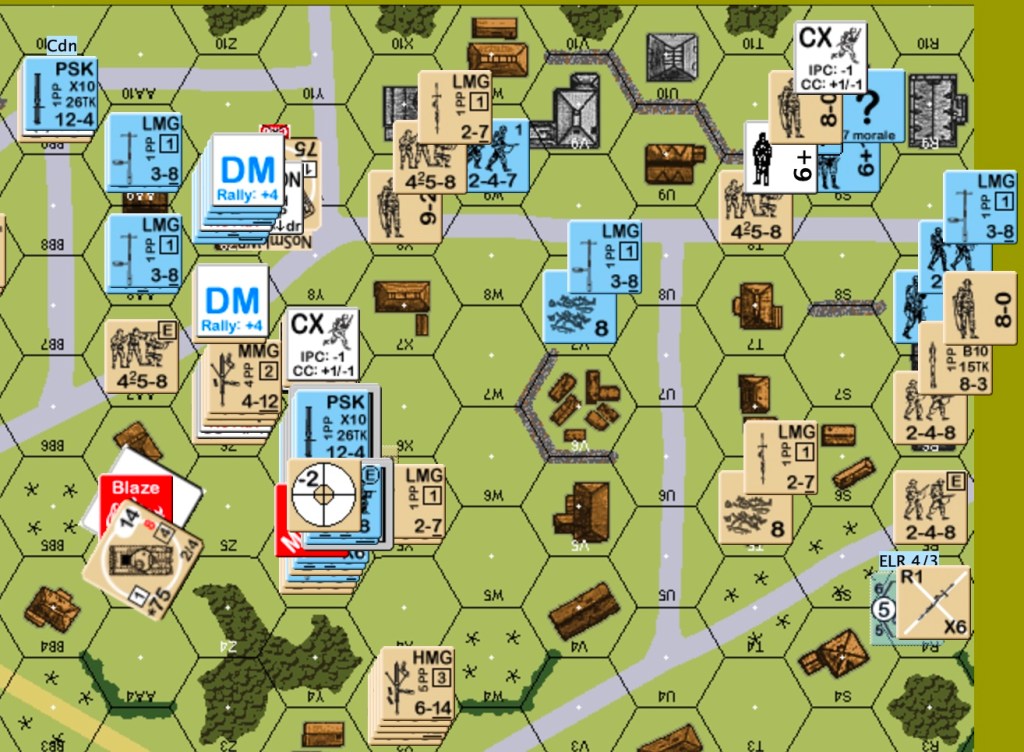
In my opinion, the German player must use some of the concealment counters to conceal his three AFV and to create one dummy AFV. I put two real AFV on the south side of the fallschirmjäger area, figuring I know three tanks will be approaching from that Canadian setup area. The building 48oZ9 really dominates the open ground, so I put in there an over strength platoon with two MG, figuring at least one will receive Canadian smoke. On either side of that position was the two concealed AFV. I placed the 9-2 with the heavy in a central position where it could move to meet the biggest threat. On board y in the west, I made a “stand and die” group of an understrength platoon among the 48Z8 buildings. The rest of the panzer grenadiers hunkered in the woods with a JgPz 4 and a dummy AFV for support.
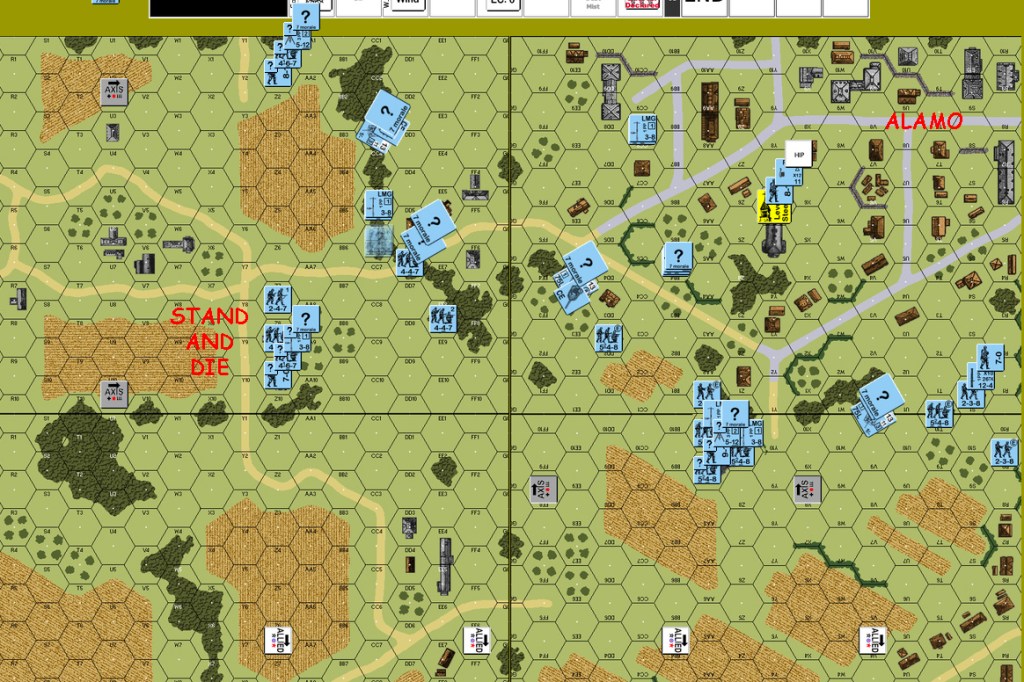
Here is the Canadian setup.
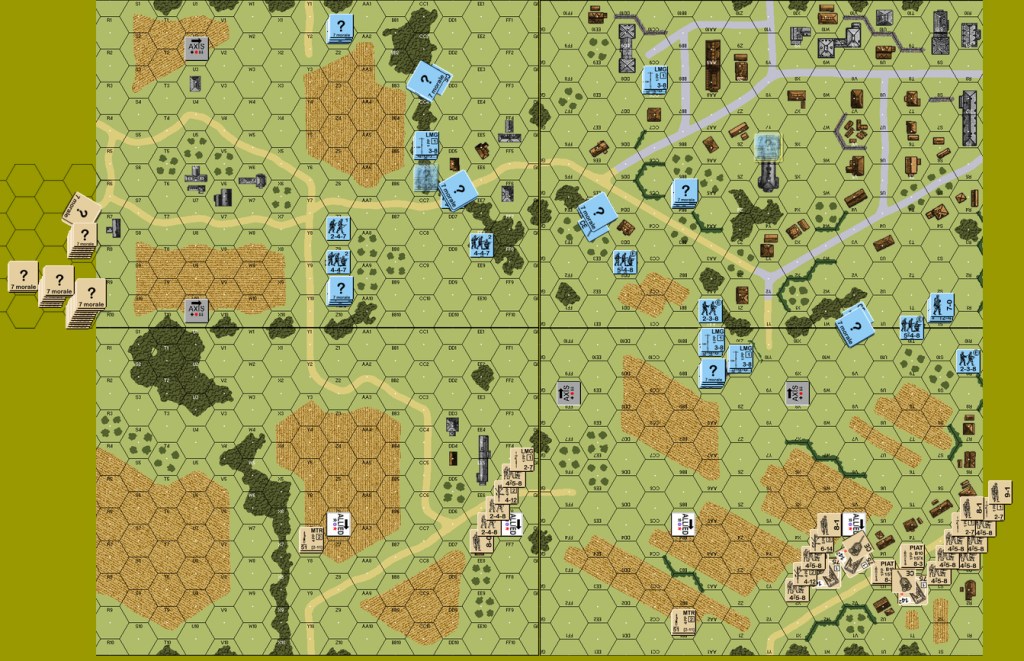
Canadian one: The onboard Canadian units tried for smoke and WP. Three Shermans did not have smoke. One Sherman DD did not have WP. One mortar broke. So two Shermans placed WP; one on the MMG in the 48oAA9 building, and the other on the JgPz 4. One Sherman had neither smoke, nor WP. A mortar, however, managed to put two smoke in front of the yZ8 buildings that held the “stand and die” group. I thought these were worse than average smoke results. The infantry of the onboard group attacked through the protection of the wooden buildings in the west, but still took some breaks. A Sherman parked in front of the shrouded JgPz 4. The JgPz 4 fired once and missed, but it had rate. Its second shot hit, but only immobilized the Sherman. The OBA draw was red.
Most of the Canadian force that entered from the west used the protection of the xU2 woods mass. A Sherman that parked on the board edge was destroyed by the JgPz 4 that could see it through orchards; with a CH, no less. One Wasp caused a 7-0 to become a 6+1, but a German MMG stunned it later.
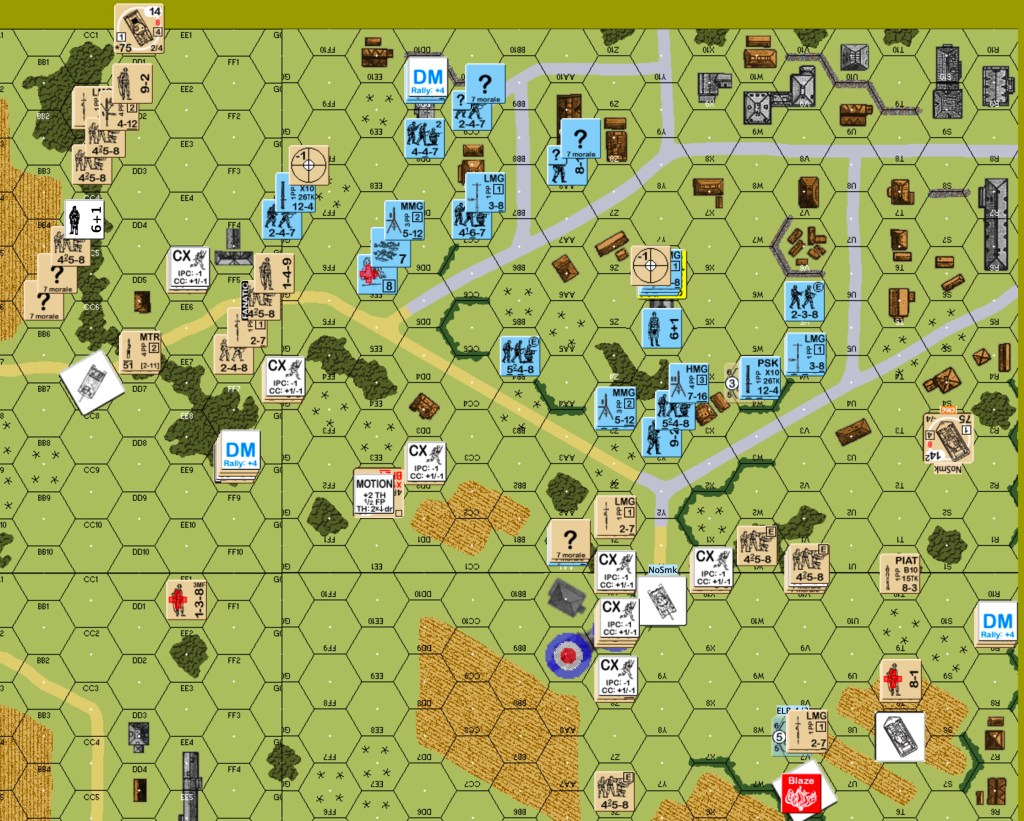
German one: the OBA got on the board as an SR in the east end. The JgPz4 in the east hit the Sherman in front of it, did not destroy it, but forced a TC that the crew failed. Most of the eastern Germans fell back or skulked. The 9-2 HMG stack shifted from the center to the east. Some of the “stand and die” group in the west changed their minds about dying. They headed for the woods closer to town. The central Pz4 went east. The northern JgPz4 moved a few hexes south. Canadian defensive fire from the center eliminated a squad in the east. A one-flat German advancing fire on a mortar team caused BH and hero creation.
Canadian two: An eastern Sherman had LOS that I did not see, to the western JgPz4. Worse, the Sherman could target the side facing. It took two tries, but the Sherman eliminated that JgPz4. Another mortar broke. The western Canadian units moved up to the buildings that the Germans had abandoned around hex yZ9. One of their Wasps attacked the MMG team in the woods to no effect. The other Wasp moved to the east to attack a second MMG team (that thought it was hiding) in the 48Z10 area. Luckily for the Germans, they passed their MC. The eastern Canadians moved closer to the German on their flank, despite giving up some open ground shots to the German defenders. The German OBA landed on the immobilized Sherman and nothing else; it had no effect. I forgot to use harassing fire. The JgPz4 eliminated that Sherman, although perhaps it should have done something else; there was a PIAT team close to it. A lucky IFT shot from the MMG team against the crew of a Wasp gave it a second stun to recall it. That was big. Those shooters were themselves the victims of a lucky shot that broke the stack.
German two: The OBA corrects onto some infantry in woods; kills one unit, misses the other. The surviving JgPz4 moves to threaten two Shermans. I was being a bit daring because of the strong frontal armour of the JgPz4 compared to the Shermans’ guns. I thought I might be able to destroy both of them, counting on a successful intensive fire. They both fail their motion attempts, but get their smoke dischargers. The 9-2 HMG team moves further east because that flank feels in trouble. The Germans pull back everywhere to varying degrees, leaving the western woods to the Canadians. The Canadians target the steeple during defensive fire, without effect this turn.

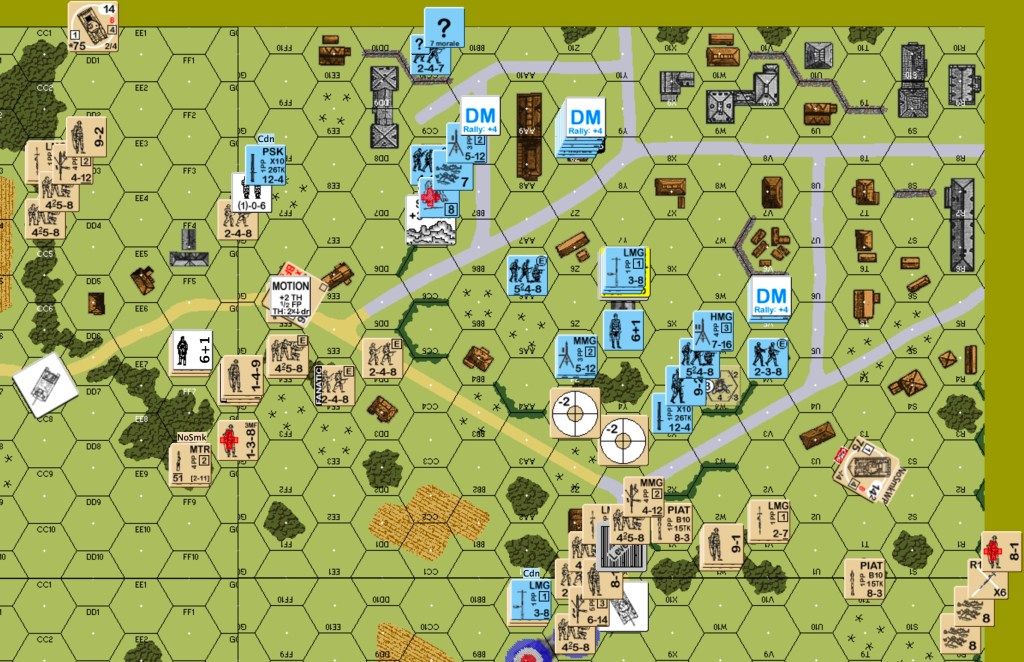
Canadian three: Gusts blow away the smokes. Only one prep fire from the east and it breaks a center German squad. A Wasp manages to sneak up on the Pz4 and toast it. The western Canadians move into the woods that the Germans left. A Sherman goes north around the woods mass instead of using the road through it, causing great disappointment to the HIP PSK unit in the woods-road hex. The Sherman acquired by the JgPz4 tries for its sD unsuccessfully, and then dies on its start MP. When the second Sherman in front of the JgPz4 also misses its sD, the JgPz4 makes an intensive fire shot and rolls a twelve. Darn. Said Sherman then does a bounding first fire kill adjacent to the JgPz4. Most of the eastern Canadian infantry shift slightly left to go around the OBA. The radio contact roll that follows is a twelve! During the Canadian advances, a squad guarding an SMC prisoner advances into the hex with the HIP PSK HS, as well as another squad to squad CC in the same area. The HIP unit comes on board, wins the ambush and withdraws with its precious PSK. We let it keep concealment, but I just looked for Q&A on that; it should have lost concealment. The other CC is won by the Germans.
German three: The “stand and die” units that fell back earlier now decide to “stand” at least behind the western woods, since running would be deadly anyway. German prep fire in the east blunts the leading edge of that attack, but triggers a sniper that removes the broken PSK team in that area. A squad is able to move in to recover the PSK. The observer leaves the steeple and a HS with LMG and 9-1 move into it. Most units move across the road to become closer to the church. Canadian defensive fire is effective in the western woods, leaving only 1.5 squad equivalents of functioning Germans in the area.
Canadian four: Only the northern Sherman prep fires, breaking a German LMG team. Everyone else moves. Most of them get to where they want to go. The Wasp eliminates a German fallschirmjäger squad in the east. There is one CC in the west of Canadian hero, squad and HS that reduces a German squad and continues as a melee.
German four: The Germans are down to nine Good Order squad equivalents with two broken squads. Units that can’t skulk prep fire, mostly to no effect. The rest reposition to meet the Canadian thrusts. The eastern Sherman targets the steeple position, breaking a CMG in the process. Other defensive fire results in only a stripped concealment and DM to a broken squad. That squad will become a HS when it risks interdiction and fails the MC. The CC ends in the Canadian’s favour without loss to them.
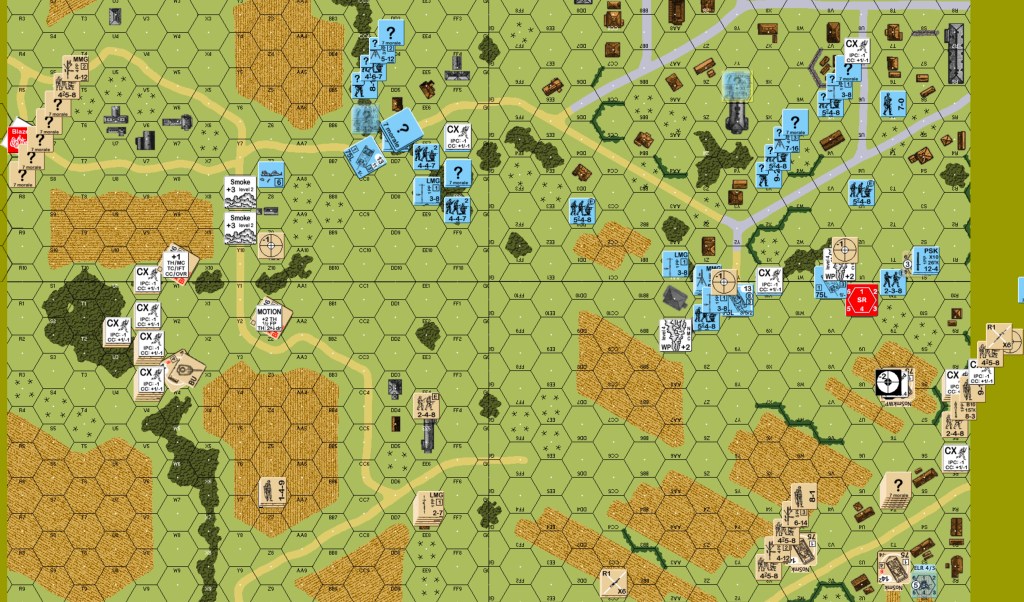
Canadian five: The Germans miss a key rally of a broken leader in the west; had he rallied on a seven, he might have brought back a MMG team on an eight. The western Sherman fires smoke. The western Canadians try several shots against the most western German unit, but achieve only a pin. I think perhaps they should have moved since the HS would probably have only one or two shots. There are still a number of Canadian squads that move forward in the west. In the east, the Canadians shuffle around to better attack the German defence later and to hide from the 9-2 HMG team; the Sherman moves to be able to fire at the 9-2 HMG team. That team can see only one HS to attack; the HS is broken and eliminated on a rate shot. In advancing fire, the German HS in the west dies to a twelve on a MC.
German five: There is only one prep fire; everyone else skulks. Canadian defensive fire is effective against the few units that couldn’t, or forgot to, skulk; one broken squad and one eliminated squad. The last mortar and the eastern Sherman combine to make the woods line defence impractical. During rout, the forever broken leader with broken MMG team in the west manages to rout after surviving several shots.
Canadian six: The prep fire phase sees some action in the east. The German 9-2 breaks, but the shot triggers a sniper that eliminates a Canadian leader and pins a squad from the LLMC. Two squads in the east that try to separately move closer through open ground are changed into one pinned HS. The Wasp breaks another squad in the west, complete with ELR failure and casualty reduction. The Canadians move a good distance in the west at the cost of a hero being wounded and a broken HS. The Germans are able to rout most of their western broken units. In the advance phase, the Canadians claim their second building.
German six: The Germans have a spectacular rally phase. The 9-2 returned and an 8-1 leader with two broken squads and three broken HS, most DM, brings back 2.5 squads that have one MMG and two LMG. They dish out some fire that breaks a fanatic HS and pins a fanatic squad. The leader in the steeple leads his LMG team to the Alamo further east. Other units fall back to the church. Canadian fire breaks one squad that routs to the church. Thanks to that terrific rally, the Germans are able to establish a better defence line in the west.

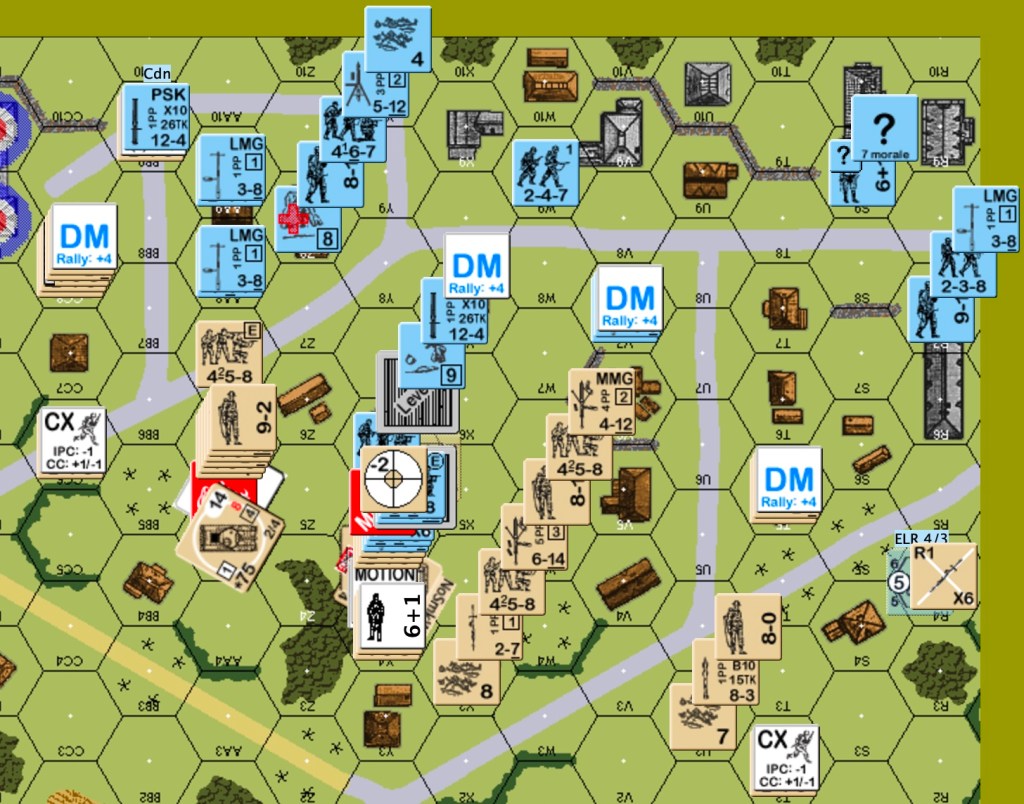
Canadian seven: The Germans now have eight squad equivalents left with a goodly amount of SW. The Canadians have fifteen squad equivalents and two Shermans, but time is short. They go straight to movement. The eastern Sherman moves to VBM freeze the forward German in the church. I use squad and HMG spraying fire to lay down two residual fire markers, but I roll a twelve, so they have lower values than expected (cowering, and malfunctioned weapons leave no residual). Once in the hex, the Sherman also pins the squad with a BFF MG shot. In the same hex, however, I have a squad with MMG on level one that can still fire. An eastern flanking move by a HS is unsuccessful. Several units approach the church from the west; I start building a wall of residual counters. Some units move into the residual around the church. One breaks out of four. The Wasp moves to attack the north hex of the church; it breaks the squad, but not the 9-2. It parks two hexes from the church and I wonder if my squad that it just broke will rally next turn. Units trying to approach the 49AA9 building in the north do not do well because of point blank -2 shots from the Germans inside. Those Germans also lay down firelanes that prevent the 9-2 stack from taking a northern approach. As the stack moves around the building in the other direction, I think I see a shot from a HS. I declare it, check the LOS to find it is blocked and then roll a two. Advancing fire is ineffective. A Canadian squad and two HS go for CC against the front squad in the church. That becomes a melee. Further right, another squad goes into CC with a HS. Despite having ambush, the HS dies and the Canadian squad is untouched.
German seven: The broken squad near the Wasp rallies with the help of the 9-2. In prep fire, it finds a PF, eats the backblast and with the help of the 9-2 destroys the Wasp. The backblast breaks the 9-2, but not the squad. The squad MC triggers a sniper that pins a German squad in the level one church location. Other German fire breaks two units and pins another. Three German units move to occupy the remaining empty victory buildings. Canadian defensive fire breaks an important German east flank unit, but I think the Canadians have run out of time with me getting units into the empty victory buildings. The melee in the church continues, which of course helps the Germans.
Canadian eight: There is very little prep fire and it is ineffective in achieving the desired results. The bypassing Sherman moves right by an adjacent German squad that cannot find a PF and pins itself as well. This happens to a second German squad as the Sherman moves into a VBM freeze position to it. The Canadian player is hoping to get people in position to cause double breaks to the HS garrisons before they can rout away. The Canadian are not successful and my opponent concedes after the advancing fire phase.
I enjoyed this scenario, but I would be worried playing the Canadians. They really need that fickle smoke. I also wonder how close the game would have been if the OBA had lasted longer. The Canadian balance is to make their side Elite to boost the special ammo numbers. That is definitely a step in the right direction, and I recommend using the balance.
Discover more from Low Ammo
Subscribe to get the latest posts sent to your email.

There’s definitely a lot happening in this scenario. Thanks for the write up!
LikeLike