
So the best thing I can do for caves now is to write up a fun cave scenario. Scenario J18 is a good example of a fun cave scenario. It is designed by Dan Dolan (most recently of Dinant fame); it was first published in BackBlast issue number one in 1994. MMP reprinted it as J18 in Journal number two in 2000. The scenario takes place in 1945 on the island of Ie Shima, which is near Okinawa. PTO is NOT in effect.
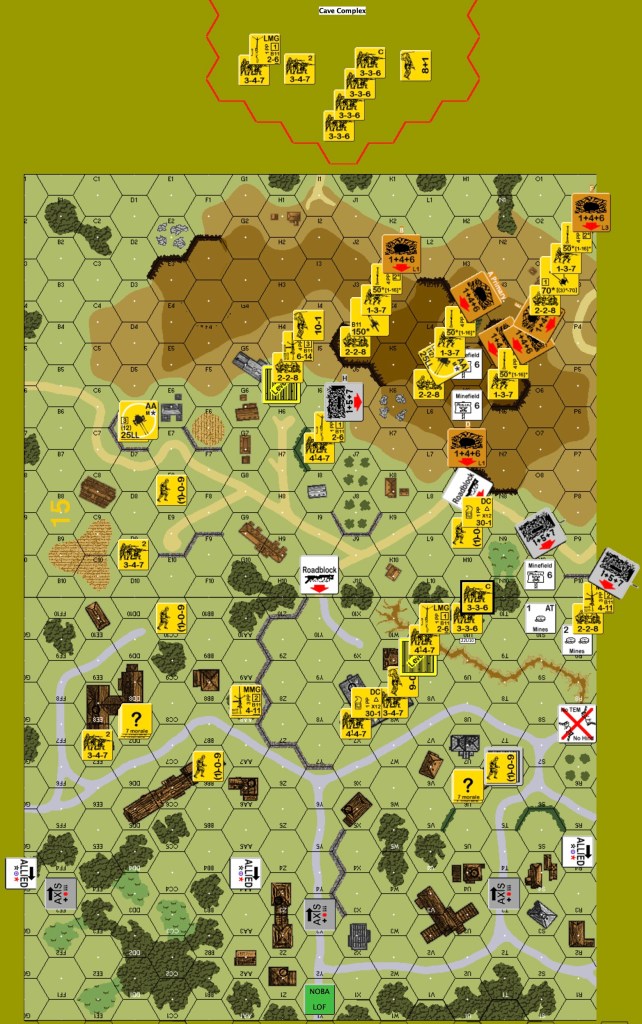
The caves in this scenario are just a part of the overall Japanese defence. Their fortifications include seven cave counters, three stone pillboxes, two roadblocks, three AT mine factors and eighteen AP mine factors. The Japanese OB that uses these fortifications is sixteen squads of mixed quality, three leaders, seven crews, one HMG, two MMG, three LMG, four light mortars, two DC, a 150mm ART gun, a 70mm INF gun, and two 25mm AA guns with an IFE of 12. Imagine: the Japanese can put the 150mm ART gun in a cave, giving it +4 TEM protection. In fact, the Japanese can place all of the guns in caves, but certain types of fire (like AA fire) are prohibited. A SSR cancels the 3-for-1 rule for cliff caves, which the Japanese needs; there are a lot of cliffs on this map.
For a change, it is the American army, not the marines, attacking. They have twenty first line squads, four assault engineer (747) squads, five leaders (including a 9-2), two HMG, two MMG, three light mortars, four BAZ45, two flamethrowers and four DC that set up on board. Armour support enters on turn one: two M18 GMC, two M4A3(75)W and one M8 HMC. The Americans also have Naval OBA of 120mm with HE and WP, directed by a Shore Fire-Control Party.
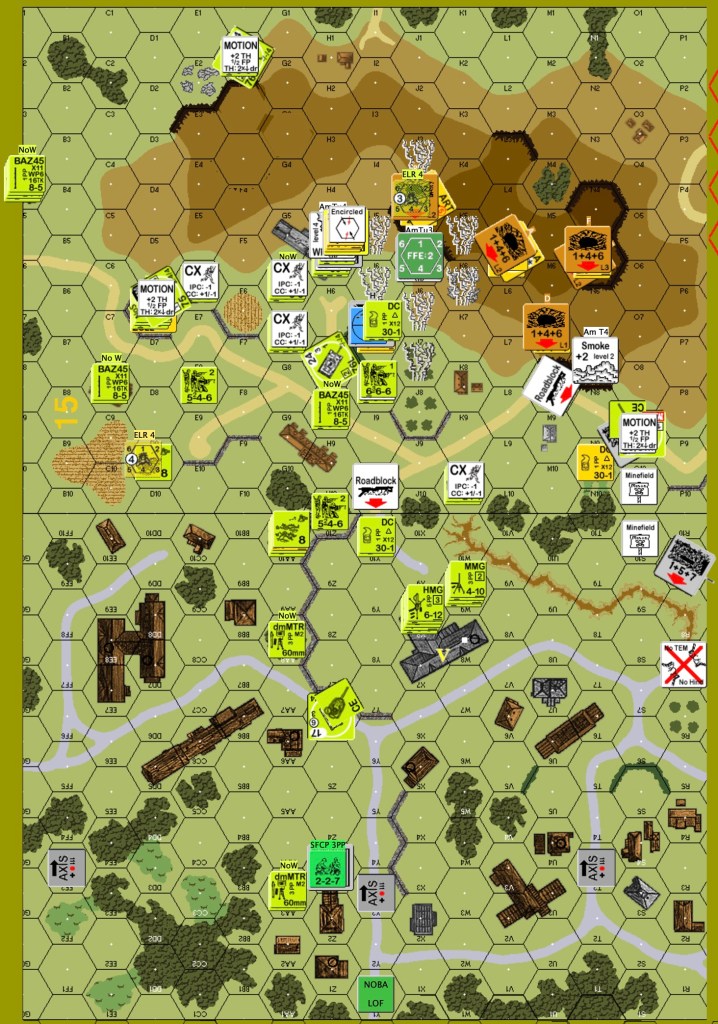
All of this stuff is packed into two half maps using boards 15 and 22.
The American objective is to take the Government House (building 22X7) and the “pinnacle”, hexes 15N4 and 15N5. They have eight turns to accomplish this mission.

The Japanese defence must delay the Americans and inflict casualties to prevent them from achieving their goals. It will be a mix of “stand and die” and “fall back”. There are no reinforcements coming, but the possible cave complex makes it possible to shift defenders without being shot at. I say “possible” just because the choice is for the Japanese player to make. However, caves without a complex are not nearly as useful. Since it is 1945, the Japanese can use a DC as an A-T Set DC (G1.6121) in any road hex. Even a hidden THH can detonate it. An American player in a 1945 scenario can avoid this surprise by stating “The vehicle is not using the road”, even if there is a road in the hex. To understand some of the shots happening or not happening in the AAR, I invite you to read rule G11.12 about the covered arc of a cave, which is different than that of a pillbox. My opponent overstacked several caves unknowingly, but they were fixed before any fire would have been affected. I learned later that the HIP THH having a DC was illegal (G1.423).
My plan as the American player was to try to head up the west (left) side of the map while leaving a sizeable fixing force in the center. Some of the flanking force would try to get behind the hill. The fixing force also needed to take the Government House stone building. I would use the assault engineers, mortars, bazookas and smoke dischargers for SMOKE as much as possible.
Before the game, I studied a bit on how to use a BAZ45 to fire WP. I was unsure whether or not to apply the SMOKE +2 TH modification to the BAZ TH. I eventually found on GameSquad an explanation that quoted relevant rules. One does not apply that +2 because the BAZ does not use the C3 TH table.

The game started poorly, with four missed deployment attempts. My WP shots, however, made up for those poor rolls. Out of eight attempts using three BAZ and three light mortars, I received five WP counters. All of these weapons depleted their WP. I had a kill stack in 22Z3, using the 9-2, two 666 and two HMG. They used opportunity fire. The SFCP was also there; they missed radio contact. One M18 loaded a rider after it entered the board, but stayed behind the action for now. A squad used the WP on the left to semi-safely search the EE7 building and reveal that it had only one squad. When a second squad moved into the same area, a HIP MMG appeared in AA8 to fire down the road being crossed. The MMG cowered. Similarly, troops could approach the Government house with some protection. Searching this time caused casualty reduction. The armour took up positions to support these attacks. Advancing fire stripped Japanese concealment in 22U10 and then striped the two conscript squads there. The M8 HMC, with its WP9 acquired hex 15H5 because the upper level of that hex is a great location for a HMG.
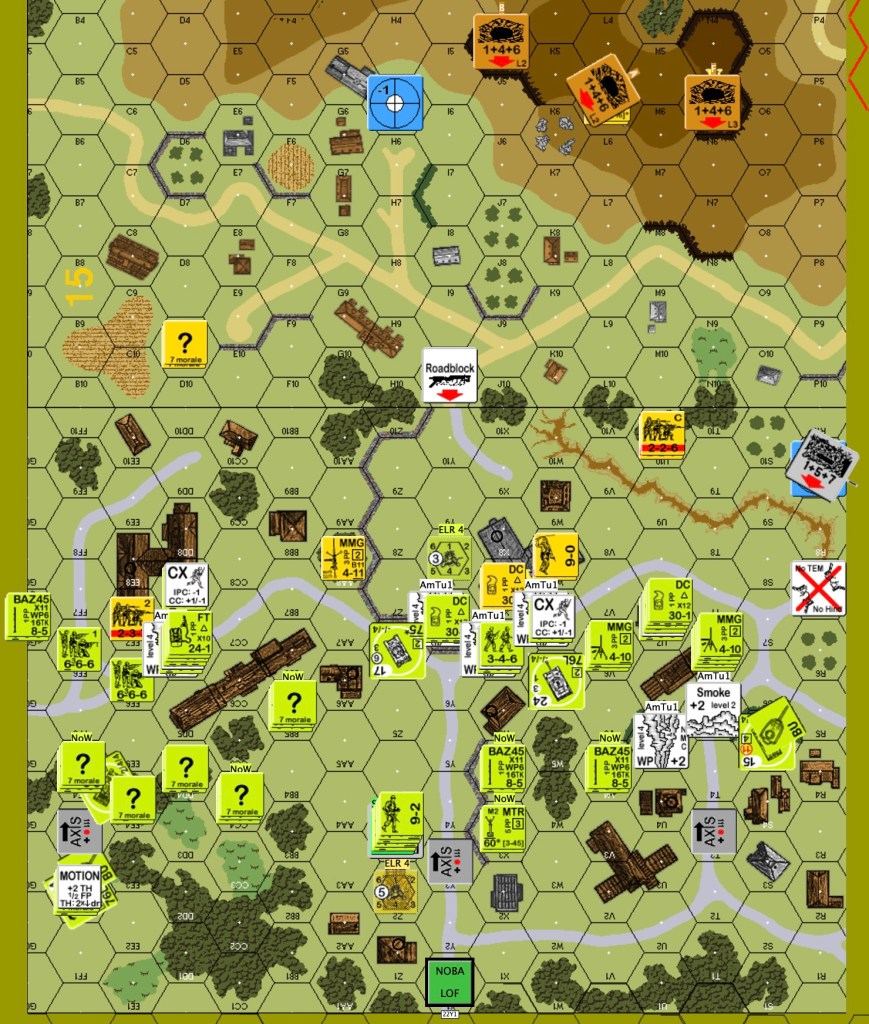
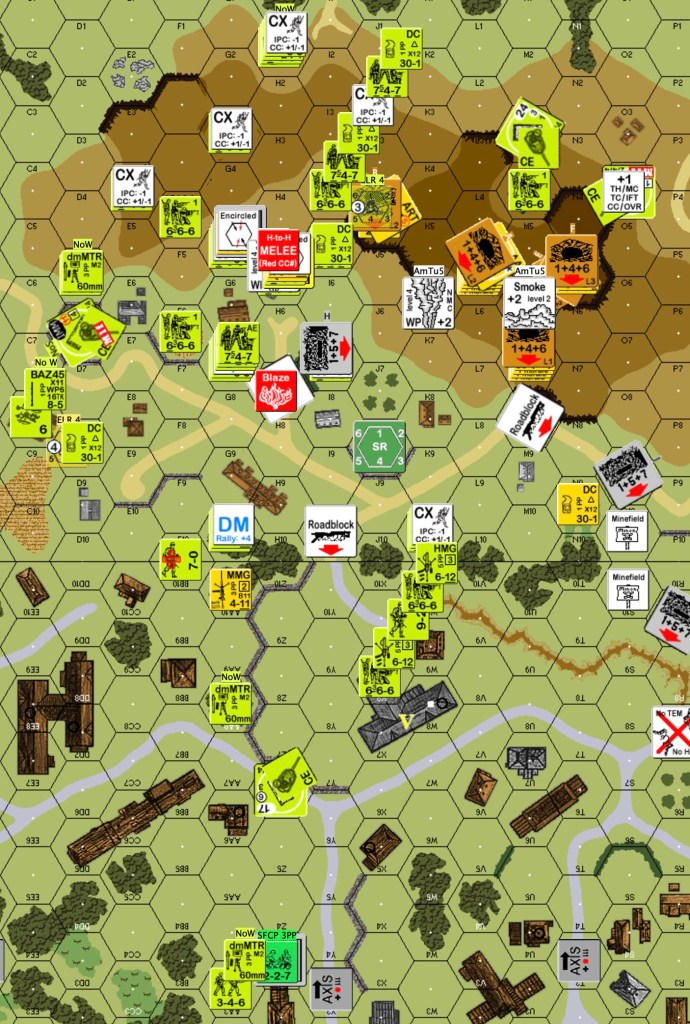
In Japanese one, a MMG started firing from a pillbox in 22R9. Its original mission was to cover the road, but the WP made shots there during prep fire not worthwhile; so it fired at a stack in a wooden building. The dice gave snake-eyes, which cowered the attack, so bye-bye rate. The three units affected all passed their NMC. The INF gun appeared in the 15N5 cave and acquired the same stack. The 150 ART gun appeared in the 15J4 cave and acquired a stack in 22U7. A THH came on board in hex 22BB6. It went for the M8 HMC, but the kill stack obliterated him. The squad in the west tried to withdraw, but the firepower there reduced it to a broken HS. Because of the WP in front of the Government House, the Japanese decided to pull out of the building. In the DFPh, the M8 HMC switched its acquisition to the ART gun cave. The kill stack did recon by fire against level two of 15H5 and found the HMG with a 10-1 leader. The attack wounded the leader and striped the crew. A Sherman malfunctioned its MA shooting at the pillbox. The NOBA got going.
The M8 HMC had the opportunity to do something unusual because of the cave. The rules (G11.85) allow ordnance to target a cave using the ITT even when wanting to put SMOKE into the cave. Furthermore, the ordnance can keep rate and acquisition while doing this. As a bonus, if the roll is not over the depletion number, but too high to hit, the SMOKE lands in the entrance hex of the cave, which is still some protection for your units. The M8 HMC fired WP at the 150 ART cave, kept rate, missed the TH but not the depletion number so left WP in front of the cave, and then made an “ordinary” WP shot against the Japanese HMG. The NOBA adjusted its SR.
The malfunctioned Sherman used its sM on the MMG pillbox and then moved past it into an AT minefield where it survived and stayed. Various infantry units swarmed the Government House. The kill stack moved up into the WP; the MMG fired and broke one squad. The left flank moved a lot forward, but needed to take care to force the broken Japanese HS to die. In the DFPh, the INF gun broke. The sniper wounded a 7-0. A striped conscript squad managed to stun the CE malfunctioned Sherman. In the AFPh, the Japanese sniper broke the rider that I had far forward. Fortunately the OT vehicle was BU. The sniper also broke one of the MMC trying to kill the Japanese HS for FTR. The HS still died. In the Government House, two 666 squads went for CC against a pinned HS and eliminated it. Two 346 HS went into CC with a squad next to that building; that went into melee.

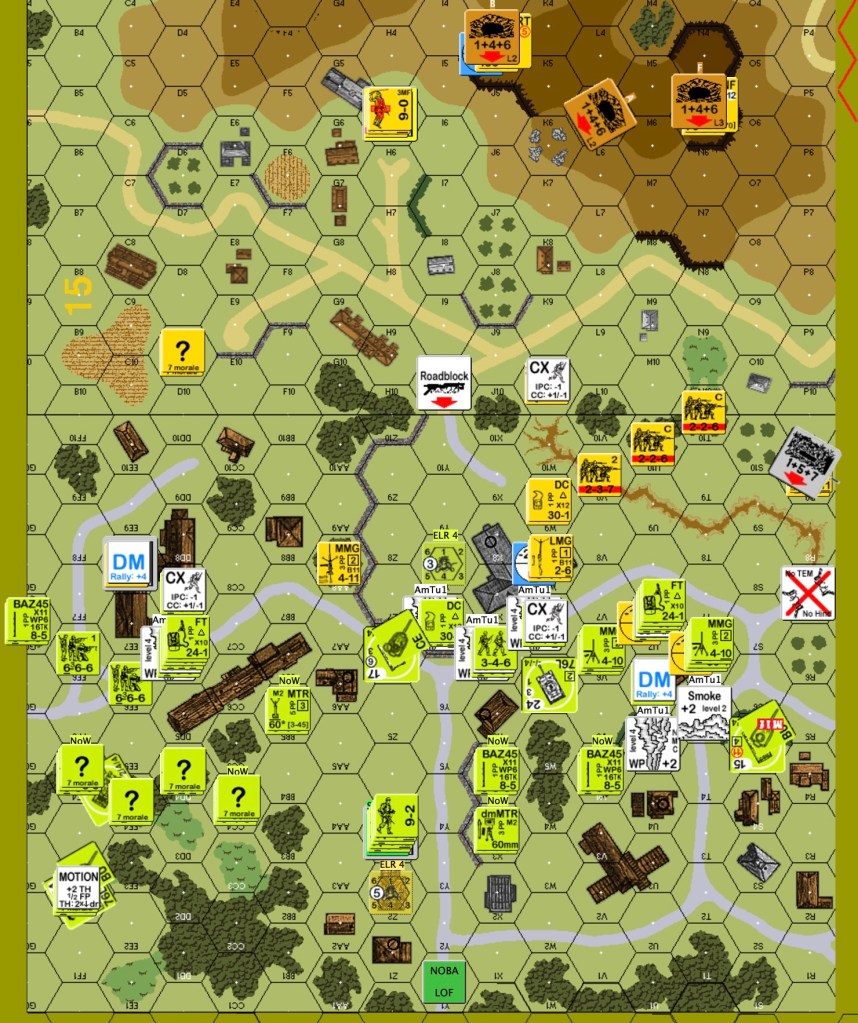
The Japanese rolled a six trying to repair their INF gun in their turn two. Even with the WP, the HMG managed to break one squad and DM another. Already, the Japanese start to have fun with their cave complex as the MMG team in the 22R9 pillbox vanished into the complex. The NOBA came down on the HMG team and broke them. Every American unit on the left side fires at the one conscript squad near them. It became a HS. During rout, the Japanese HMG team abandoned the weapon and routed downstairs with the leader for more protection. The CC in 22W9 ended in mutual destruction; one squad equivalent each. In the APh, some caves received new occupants, but the pillbox remained empty.
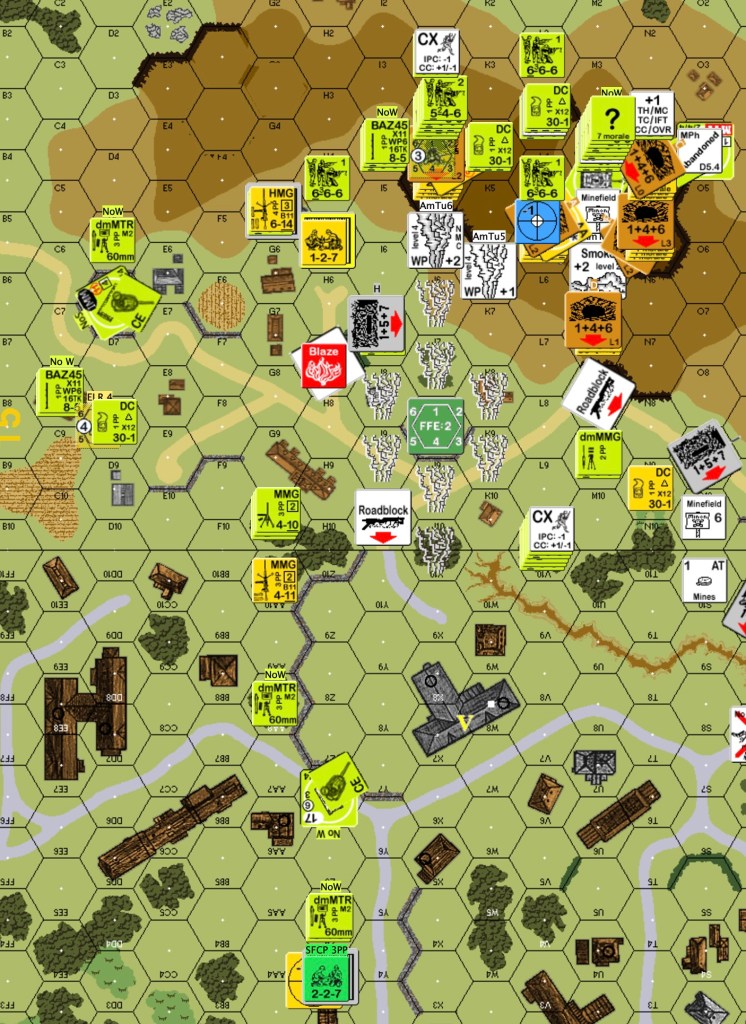
American turn three: The M8 HMC added more WP in front of the 150 ART. The NOBA pounded the HMG team again, but to no effect other than making it risky to retrieve the HMG. The Sherman near the western Japanese conscript HS broke the HS. The malfunctioned Sherman successfully exits the AT minefield, moves through an AP minefield then overruns a HS and stays in motion in the hex. The middle M18 moved into the gully and then adjacent to a Japanese striped conscript squad; bounding fire made it into a HS. A squad moving in open ground was hit by the 150 ART through the WP hindrance; the 666 broke. An AA gun (12 FP IFE) appeared in the 15L5 cave to fire at a squad moving in the open; amazingly the squad survived unbroken. That same squad continued its move into a building, where it eliminated a HIP THH. The second AA gun appeared in a walled orchard (15D6) to fire point blank at a passing squad. The squad was broken, ELR’d and casualty reduced, but at least the AA gun did not have rate. I managed to move a FT to within two hexes of that AA gun. A lot of the units from the area of the Government House move carefully forward and towards the middle. The FT striped the AA gun crew. Advancing fire eliminated the center Japanese unit in the way of the Americans. There were a good number of broken American units at this point, but there were still lots of turns to rally and continue.
Japanese turn three: Several American squads rally. The two AA guns fire. One has no effect, the other breaks a squad and a HS with rate. The 150 ART misses its target in the Government House. A THH appeared in the 15M9 building. It ran for the nearby motion malfunctioned Sherman. First DFF wounded it. Second DFF eliminated it. Another THH appeared in 15CC10, an even tougher position. Same thing happened to it. A Japanese leader in the middle soaked up some defensive fire trying to reach the caves. This generated a Japanese sniper that broke an assault engineer squad in the west. The NOBA corrected as an SR to be in front of the 150 ART for next turn. Other defensive fire did nothing.
American turn four: The M8 HMC put WP on the HMG team again; important because they were back with the weapon on level two. The NOBA brought down WP centred in front of the 150 ART; it also affects the AA gun in a nearby cave. The kill stack in the Government House broke the unit in the 15M7 cave to make the approach safer. The west Sherman moved toward the AA gun in the orchard. Bounding fire didn’t do anything, so the Sherman moved into the gun hex where the gun immobilized it. The west M18 was able to load a rider and move behind the hill. The east Sherman used its sM to place smoke, left its hex and then came back to overrun the HS that was still there. The malfunctioned, +1 for stun, Sherman eliminated the HS. A lot of MMC moved forward. They found another pillbox in 15I7. Japanese defensive fire was very limited because of the WP; what little there was did no damage. American advancing fire was ineffective. Advances went after the orchard AA gun in the west, the newly found pillbox, and into the building having the Japanese HMG team. The HMG team would suffer from upper level encirclement. The 15I7 pillbox contents were revealed for CC; a squad with LMG. Both sides survived, but there was no melee because of the pillbox.
Japanese turn four: No prep fire. Any unit in a cave that felt threatened moved into the complex. American defensive fire breaks the HMG team. They can’t rout very far.
American turn five: That HMG team rallies on its first try, without help from a leader. At least the HMG is in a different location. The M8 HMC puts out another WP round in front of the AA gun cave this time. The NOBA WP mission ended and I believe we removed the WP at the same time, which is an error. The +2 WP should have changed to +1 WP. I was successful in my access draw, but NOBA cannot stay pummelling the FFE:C location; it must start over with an AR. Almost every unit moves. Only two squads get broken by defensive fire. Before it moves, I try to protect the center M18 by throwing several infantry smoke. Unfortunately, the 150 ART still manages to hit and destroy it. The Japanese sniper was triggered and eliminated an 8-1 leader that was in the open; it was planning on advancing into a building containing a broken unit. A lot of units are now on the hill, and a few are behind it. I send a 666 squad into CC with the leader holding the HMG in building 15H5. The squad ambushes the leader and then rolls a twelve! The leader has nowhere to which to withdraw, so it stays and makes a HtH melee. I advanced a squad into the 15I7 pillbox to prevent the Japanese from using it again.
Japanese turn five: The 150 ART fires at the SFCP. Fortunately for them, it misses. The cave dwellers skulk except for the two guns. American final defensive fire doesn’t do anything, partly because their HMG teams dismantled their SW to move next turn. The leader versus squad CC ends with the leader dying.
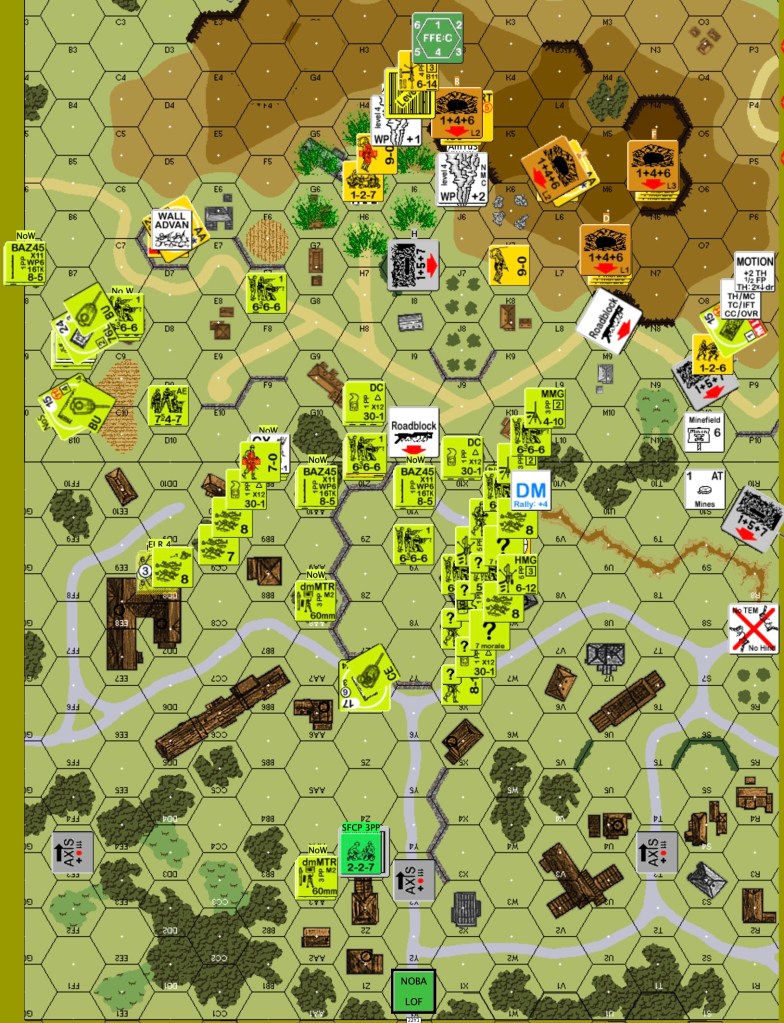
American turn six: The M8 HMC put WP in front of the 150 ART again by missing putting the WP into the cave. The NOBA put down a WP mission. Behind the hill, the crew of the malfunctioned Sherman abandoned it since the tanks cannot go higher than level two by SSR. The M18 moved to get up close and personal with a cave on the pinnacle. A lot of units continued to move along the hill towards the VC hexes. Searching from the 15M4 woods found that 15M5 had AP mines. I expect the other approach hex, 15M6, to also be mined. The Americans now have about 14 squads on the hill, but they don’t know what the Japanese have left to defend the VC hexes.
Japanese turn six: Every one but the 150 ART hid in the complex. Because of its size, the 150 ART cannot enter the complex (G11.76). The SFCP lost radio contact. Japanese infantry units of course re-occupied the caves that face the Americans.
American turn seven: The NOBA missed radio contact again. The M18 adjacent to a cave managed to miss it. The Americans assaulted the 15M5 mine hex with infantry smoke and careful movement. One of the units was a 9-1 with flamethrower. The 15N4 cave had a crew with MMG in it that put down a fire lane. Assault engineers made it to 15M6 which was of course mined. They survived the mine attack. The 15N5 cave had a HS with LMG; they did not harm the 747. That cave also had a HS with a light mortar, which also failed to harm the 747. The M8 HMC repositioned to better support the final push; it later broke its MA in advancing fire. Final fire from the Japanese MMG broke the leader and two of three squads in 15M5; rate led to MMG malfunction. Advancing fire broke only one cave HS. After the routing, the Americans have one pinned 747 in 15M5 and one 747 in 15M6. The unpinned 747 tries to advance out of the mines, but breaks to a MC. So I need to advance more American units into both minefields. Two 666 squads make it into 15M5 in Good Order. One 747 gets into 15M6 in Good Order. Can anyone survive the next Japanese fire phase and safely exit the mines to move into the VC hexes?
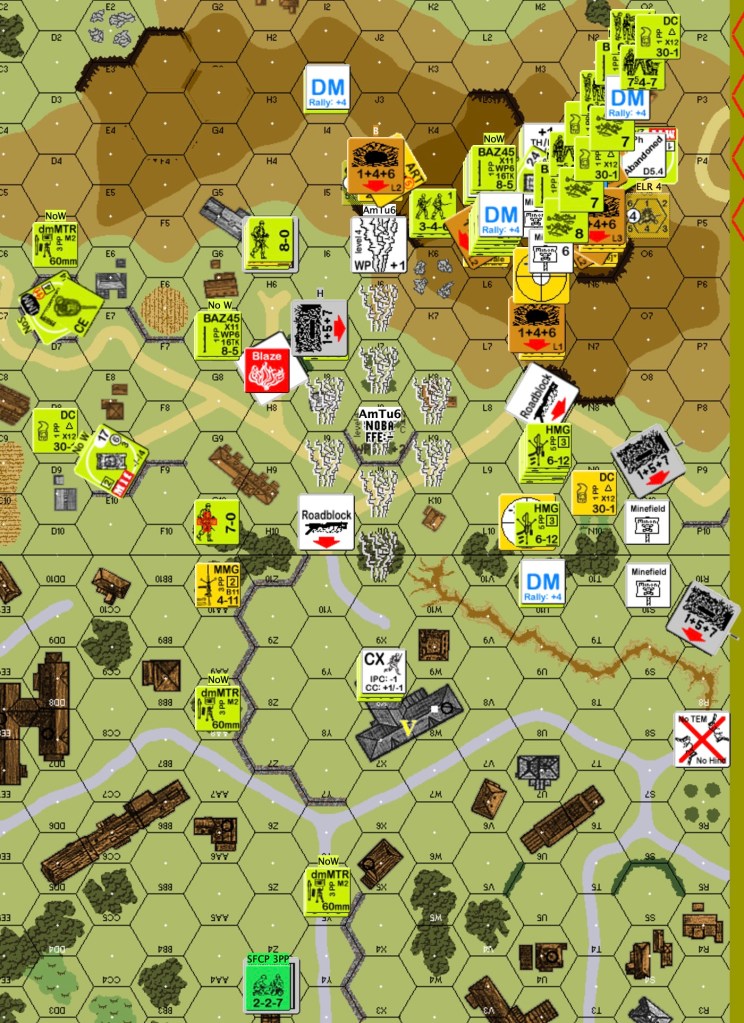
Japanese turn seven: They repaired the cave MMG in 15N4. The MMG fired point blank eight FP at the three squads in 15M5. Dice say 1MC. All three squads pass! The MMG had rate and fired again. Dice say NMC. Two of three squads pass!. Stupid MMG had rate again. Dice say NMC again. This time, the two Good Order squads break. Rats! The HS in 15N5 fired point blank two FP at three units in 15M6. Dice say 1MC. One 747 is left in Good Order. American defensive fire breaks the unit in the 15N5 cave and stripes the crew in the 15N4 cave. I can’t see how in the log, but somehow the Japanese fired on the units in 15M5 during the AFPh. The ensuing MC triggered one HOB that rallied a squad and generated a hero. Additional Japanese units reinforce the two caves during APh.
American turn eight: So it comes down to three MMC in two mined hexes to determine if the Americans win the scenario; technically other units could move into and out of the mines the odds against those units are high. I do some prep fire in case those units need to try that. A long range flamethrower shot breaks a HS in the 15N5 cave, but the second HS is still okay. The M18 next to the 15N4 cave hits it with HE. The attack breaks the MMG crew and leaves a second crew pinned. The first unit to move is the 747 in the 15M6 minefield. The mine attack misses! The 747 moves into the VC hex. In the 15M5 minefield, the first 666 is hit with an NMC which it passes with snake-eyes. HOB makes the squad berserk, so it is stuck there charging the cave forever. The second 666 breaks trying to leave. The Japanese do some defensive fire to try to clear the Americans out of the minefields. They are unsuccessful. At this point we called it because the 747 will advance to the second VC hex and the Japanese can do nothing to take them back.
I like the scenario. I had played it previously as the Japanese and enjoyed it then as well. Of course, the Japanese player needs to take the time to make a good defensive setup. In our previous playing, the Japanese sniper took out the SFCP early, so those WP fire missions did not happen and the Government House held out longer than in this game. The Japanese won that playing.
Discover more from Low Ammo
Subscribe to get the latest posts sent to your email.
