
I had this scenario on my play list because of the history behind the scenario. As the Battle of Normandy wound down in the middle of August 1944, a lot of Germans were becoming trapped in what became known as the Falaise pocket, so named for a town near where the two Allied pincers where trying to meet. The Canadians and Polish were in the northern pincer; Americans were in the southern pincer. The late Ian Daglish designed this scenario that features Polish infantry and armour versus a hodgepodge of German infantry and armour. The “Mace” refers to the twin peaks of Mount Ormel.

Both sides suffer from Ammunition Shortage. For the Germans, it is obvious why; their logistics system in Normandy was non-existent at this point in time. If I remember my readings correctly, the Polish had been in intense battles for several days and had no opportunity to re-supply. I disagree, however, with having a fuel shortage SSR DR for the Polish vehicles and not for the Germans.
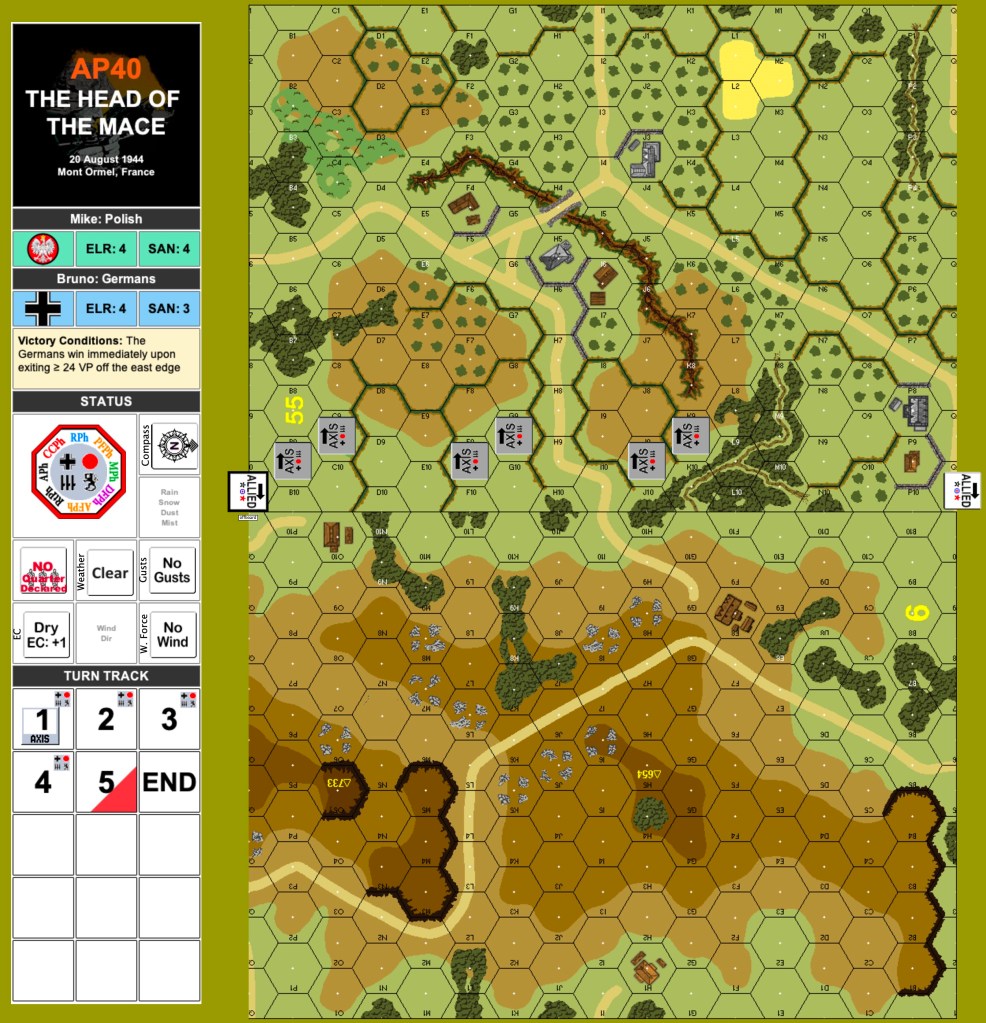
Boards 55 and 9 each contribute half of themselves to this scenario. The Polish set up on the hilly board 9. The Germans set up on the bocage-y and somewhat-less-hilly board 55. The victory conditions require the Germans to exit 24 VP through the Polish and off the east edge. They have five player turns to use.
The Polish OB has two Firefly Shermans, four regular Shermans, two 57L AT guns, two AA Crusader AFV, thirteen squads, four PIATS and five leaders including a 10-2. An SSR allows the Polish AFV to set up HD on the hills, and the infantry can set up entrenched. I had the Polish side. The HD SSR tempts one to set up with a lot of AFV in HD positions; I decided to put only two regular Shermans in HD positions. HD positions are no guarantee of immunity; I’ve sometimes lost a HD vehicle to the first shot taken against it. I decided it was worth it to have at least one German AFV will need to spend turn shooting at my HD vehicles. I put the rest out of sight, knowing that the Germans need to come to them. The AT guns do not have a lot of concealment terrain in which to hide. I put them in about the center with one covering each flank. Only one of them was in concealment terrain. I took the same approach with the infantry; some were situated to be able to fire right away; most were setup to wait for the Germans to come to them. Every infantry stack was in a foxhole, except for a squad in a wood building. This served two purposes: for protection and for “concealing” my setup from opponent. Of course, this is mostly a “stand and die” defence due to the nature of the map and scenario VC. The Polish leadership is so good that every PIAT team has a negative DRM leader with it. The four PIATS are the only SW counters in the game, which is pretty unusual.

The German forces have a nice on board group reinforced by another nice group, then followed by random stragglers from other units. The on-board group has ten squads of SS 6-5-8, two leaders, two Panthers and three Pz4H tanks. The first reinforcing group has nine 5-4-8 paratrooper squads with three leaders, one of which is a 10-3. The random stragglers are counters placed in a cup, several of which are drawn on the turns two, three and four rally phases. The infantry portion is predominately second-line and conscript. The vehicle portion has a Pz4H, a Wespe, an AC, a halftrack and two trucks. I believe that the German attack will almost always pick the north or south flank, not a broad front attack. The crag hexes in the middle cause choke points for vehicles trying to get through them. Infantry that move up the middle could run into encirclement issues and rout issues. My opponent chose to have two Panthers set up in the middle and south to target Polish hilltop units. Everyone else took the north flank.

German turn one: the south Panther failed to hurt any infantry with its MGs, but killed a HD Sherman on the first shot. The second Panther targeted the concealed AT gun with MGs and MA; no effect and a broken MA resulted. My opponent’s misfortune continued when a Pz4 also broke its MA. The Germans started moving; misfortune continued. The first defensive fire rolls up a KIA against a HS. There was a second KIA before things started to become more reasonable. A Pz4 moved up. The AT gun hit it with rate and a result of possible shock; the Pz4 passed. The tank continued to move; the AT gun fired again without rate, and a high TK. The nearest Sherman took a shot and missed. The Pz4 continued; the Sherman used IF and rolled boxcars. The Pz4 made its way to the foxhole line. A second Pz4 followed it. Many infantry moves followed and I built a wall of residual counters. A couple of the infantry also made it to the north foxhole line. After the on-board units finished moving, the first batch of reinforcements entered from the north edge, as required, and took position behind them. Advancing fire broke one of Polish squads. Two German HS advanced into a foxhole for CC with a Polish HS. A German HS died and a melee ensued.

Polish turn one: the rallies resulted in a berserk German squad. Polish prep fire was good. German MC rolls were not. I shifted one Sherman to the right, as well as a PIAT team with a leader. In DFPh, the south Panther breaks its MA. A Pz4 fires into the melee; the Germans HS broke, but the Polish HS didn’t. The Polish HS had no trouble eliminating the broken HS in CC.

German turn two: the random reinforcements were set up. Some German units rallied. Only the Panther prep fired; the target was the visible AT gun. The first unit to move should have been the berserk squad, but we missed it. A Pz4 at the foxhole line spent all its MP to enter the woods and bounding fired at the HS there, which broke. The Pz4 bogged. A second Pz4 entered the same woods hex using all its MP. Infantry started moving across open ground. Defensive fire broke, pinned and eliminated some units. Several 1FP residual markers were now in the way. The third Pz4 moved forward. The AT gun hit it without damaging it. We finally noticed the berserk squad. It walked through open ground and residual counters successfully to join the two Pz4 in the woods. One particularly unlucky squad was eliminated moving in a woods hex by a leader directed 4FP shot with a DR of snake-eyes. We checked my dice stats at this point. My IFT DR average for 23 rolls was 5.83. My opponent felt he had to risk a leader led stack of two squads moving through the residual counters. The first two had high DR, but the third had snake-eyes. 1FP at net zero is a KIA. A squad dies and the rest are broken.
At this point, my opponent decided to concede. Between the MA breaks and the infantry losses, he felt that he would not be able to win the scenario. We agreed that the dice skewed this playing of the scenario. Mathematically, he still might have had a chance, but things were certainly looking negative.
I thought about how to do better as the Germans. I agreed with the north flank choice; it has more woods hexes. I would use the three Pz4 for smoke prep fire shots in that area. I would use the two Panthers to lead the infantry attack with armoured assault and smoke dischargers. The three Pz4 would set up close to the rest of the German forces to have more flexibility to support the attack. Perhaps I will try it as the Germans one day. Another idea is to send the SS infantry with some armour against the south flank, while the paratroopers with some armour go against the north flank. That may lead to less running through residual fire, and might cause issues for the poles positioned between the too attacking forces.

Discover more from Low Ammo
Subscribe to get the latest posts sent to your email.
